(click to enlarge)
The goal here is to develop applications, mostly games, to be run on the Nintendo DS, from the hobbyist point of view, as opposed to a software/game production company. This kind of development is called homebrew.
We do not support piracy or the illegal use of the copyrighted Nintendo SDK by non-licensed developers. We use here unofficial development kits, such as devkitPro. These coding efforts are to remain free and legal.
This document is a guide rather than a tutorial or a reference book: somewhat in between these two kinds of writing, informations are thematically organized (instead of being introduced incrementally like in a tutorial) without aiming at the exhaustiveness of a reference source (such sources already exist, and links to them are provided). Only DS-specific knowledge is gathered here, the reader is expected to be already familiar with at least some form of programming.
Portable development will be kept in mind, as having one's game working both on a DS and on a PC is quite enjoyable. In this guide the C/C++ language will be favored. The development platform will be a standard PC, preferably using GNU/Linux.
Most of the informations here came from several homebrew websites (many thanks to Cearn for TONC, to Dovoto, Chris Double and Mollusk for their respective tutorials) and from IRC discussions (notably, thanks to Wintermute [Dave Murphy] and sgstair [Stephen Stair]). More generally, many thanks to the fearless homebrewers !
This guide has been created by Olivier Boudeville (a.k.a. sye).
First of course is the Nintendo DS itself (see a video presentation). It should be a DS Lite, which is quite superior to the previous "fat" version: better screens, thiner, lighter, better autonomy, more beautiful, etc. The color does not matter, but we found the black version quite sober, which opens it the possibility of somewhat faking a classical PDA. This is one of the intended uses in my case, besides game programming.
The main competitor for the DS would be Sony's PlayStation Portable, PSP, although they are quite different in price, capabilities and market shares. The lack of input device other than the gamepad, the quite low autonomy, the price and Sony policies make a lot of people favour DS over PSP, at least for the usage intended here (PDA and homebrew).
As most console manufacturers enforce a unique pricing for all vendors, choose the one with the better conditions (guarantee, return policy, etc.), preferably not online: dealing with real shops is convenient, especially to have one's DS replaced whenever there are dead pixels. This happens quite often apparently, and not all vendors accept easily to replace it.
As for me, I bought my DS Lite in France, in a FNAC shop (I could cancel my buying during a 15-day period), in may 2007, for 150 euros, and had no dead pixel.
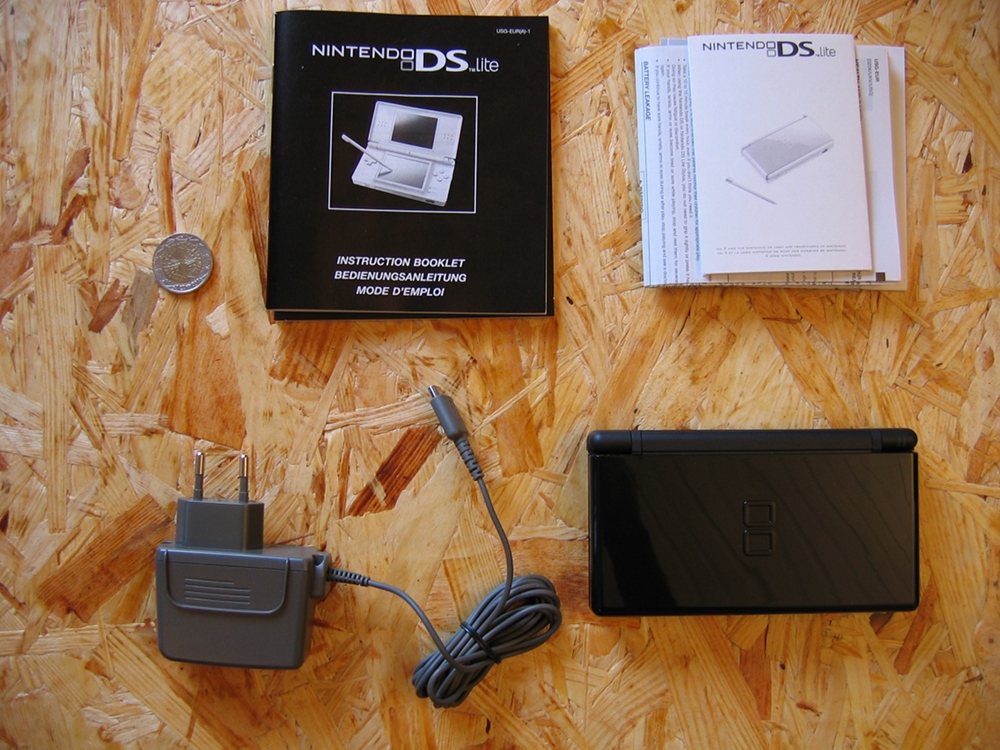
Here is the content of the Nintendo box:
This box includes only:
You can make a better use of your DS potential thanks to them.

From the most useful to the least:
I bought a Bigben Interactive pack of 5 accessories (6 euros) and a (black) Subsonic Premium Pack (mostly for the leather case; 15 euros), both of course for DS Lite. Hence one can have all these recommended accessories for quite a low price.
See also the Wikipedia article about DS accessories.
Having a basic console is not enough to be able to program it: Nintendo, probably due to the fear of piracy, preferred to make the life of homebrewers more difficult than technically needed, notably thanks to hardened firmwares preventing modifications or execution of non-acknowledged code. For example, Wifi demos are apparently protected by a RSA check (at least parts of them are encrypted with a private key from Nintendo), and the DS uses the embedded public key to decipher these demos before running them.
Hence, to have access to a DS that can be programmed, one has to circumvent these protections. One of the simplest ways of doing so is to use special game-like cards, at least once. This is a vast subject and many cases have to be taken into account, see Booting Tools on Wikipedia for details.
As the DS is not sold with a rewritable storage medium or anything like it (no standard card reader, no USB port, etc.), some specific device is required so that the DS can load homebrew applications. Though one could instead use WMB (Wireless Multiboot), which is a method to send programs to be run on the DS using a PC with specific Wi-Fi adaptors, this method would not be convenient enough: transferred content would be lost on the DS as soon as it is powered off, a Ralink-compatible Wifi adaptor would be required, the sent applications could not occupy more than 4 megabytes, a hacked firmware would be needed, etc.
As for me, I intended to have Linux working on my DS, and for that the native 4 megabytes of RAM where quite small, so I wanted to have both 32 megabytes of additional RAM (the maximum size that can be addressed by the related DS bus) and access to mass storage on removable media.
The best and simplest bet for me was to use, in the slot-1 (the DS-specific one, small and at the top of the console, a.k.a the DS card), a SuperKey (a kind of NoPass) as a fake game used to enable the execution of code from the slot-2 (the big one at the bottom, used for Game Boy Advance compatibility, a.k.a. the GBA cartridge). This slot-2 would host a SuperCard Lite (note: avoid the rumble series, it does not provide more RAM) which, besides the 32 megabytes of RAM, offers a microSD port. It is micro indeed (not mini), and SD stands for Secure Digital.
Homebrewers not interested in running Linux on their DS and searching a cheap and well-supported solution may choose the R4DS, a slot-1 linker, using also microSD cards.
I bought both the SuperKey and the SuperCard Lite (black version) from FL-games for 65 euros (shipping included) and was quite happy of the cards (no compatibility issue between the two cards to be afraid of) and of the store. I would not say the same of another french store I tried.
On this subject, although we are not affiliated in any way with them and (for the moment) we never bought from them (we heard of them too late), we would recommend nevertheless electrobee, a small Canadian store run by Natrium42, as their prices and reputation are good, and also because Natrium42 contributed a lot to the DS homebrew community, especially regarding hardware add-ons.
Here are the three boxes, for the Nintendo DS Lite, for the SuperKey and for the SuperCard. Note the two-euro coin: they are quite small indeed.

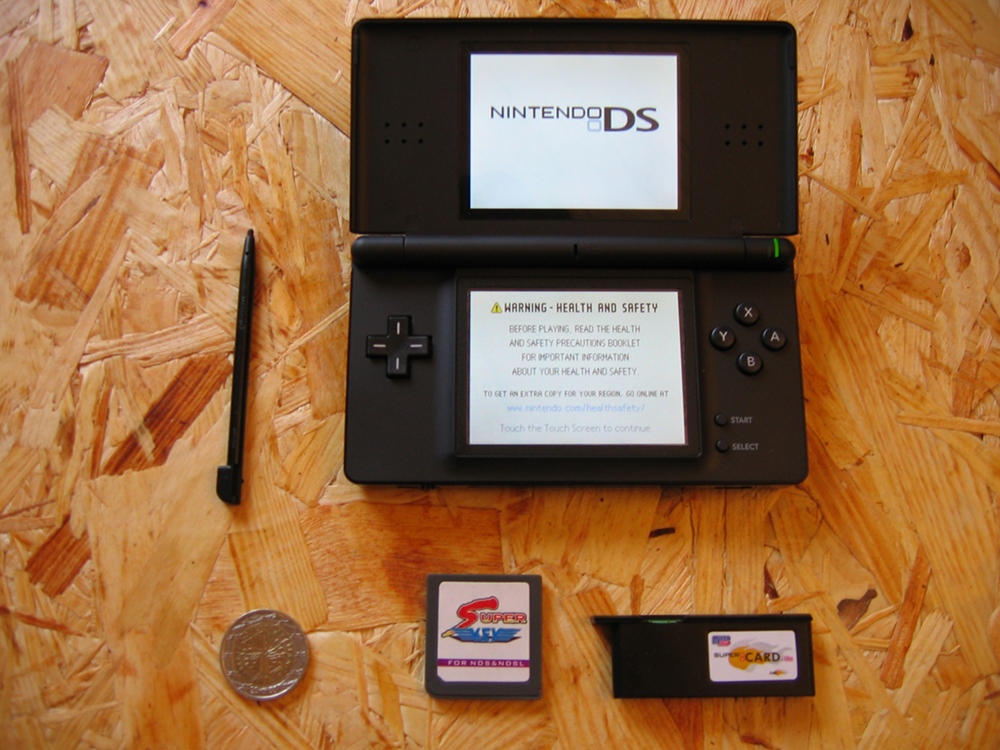
Here is a view of a bare DS running the default firmware (hence the mandatory health and safety warning) and, below, the quite tiny SuperKey and SuperCarde Lite themselves:
Last but not least, one should have one micro-SD card at least, I bought a 2 gigabytes Kingston one from PC-look for 28 euros, shipping included. My laptop had a SD reader/writer (well, Ubuntu could not use it properly but it is another story), so there was no real need to buy anything else. Separate USB reader/writer are quite inexpensive anyway, and it is hard to buy a R4DS with no such card reader/writer included. Check that your micro-SD card is sold with a SD adapter, so that the actual tiny micro-card can fit in a basic SD reader.
To use your micro-SD, you should first format it in FAT (i.e. FAT16, not FAT32), as factory settings are not reliable in all cases, or are not the expected ones. Formatting can be done both from Windows or from Linux (see our FAT-dedicated section).
FAT is for the moment favored over other filesystems by most homebrewers, mainly because it is adequate for small size storage media, and for the sake of simplicity: there already exists a library for it on the DS, libfat.
Finally, in my case, the full equipment cost only 265 euros.
An alternative setup to the SuperKey/SuperCard is to use the R4DS linker:

This package costs about 35 euros (cheaper than the SuperKey+SuperCard pair) and is very useful when having problems with the SD support on Linux, thanks to the USB interface. A drawback is that the R4DS, being slot-1, will not provide additional RAM to applications such as DSLinux, whereas the SuperCard does. However DSLinux works well on the R4 DS.
Such removable media (as microSD) are not the magic bullet for the frantic homebrewer: to anticipate a bit on further subjects, when generating programs for the DS from your PC, to test them you may either execute them "in place", directly on your PC thanks to DS emulators (but they do not behave always as a DS would behave) or you have to send them to the DS, one way or another.
This can be done thanks to the aforementioned microSD card, but it soon becomes tedious to swap again and again the card and its adapter. Furthermore some linkers, like the R4 DS, use a spring-based microSD slot. It makes the swap still harder, as in order to remove the microSD, one has to push it first, which may push as well the R4; in that case one may pull the full linker instead of just the microSD. Annoying when performing trial and error debugging.
An alternate way would be to use a Wifi access point or a Wifi router, preferably not a mere Wifi adapter, which would have to embedded a specific chip etc. in order to work with the DS. Such devices could be for example the famous Linksys WRT54G routers (55 euros approximately) or La Fonera, both of which are inexpensive and, on a side node, run Linux, whose firmware and software can be programmed, etc., in a very similar way to the one we are to program applications for the DS. Note this may involve running specific software on the DS (ex: DSLinux) to transfer ROM wirelessly, which may or may not be more convenient than the basic card swap.
Other still less usual methods would be to rely on:
Finally, using a USB reader/writer like the one provided with the R4DS is probably one of the best solutions.
The snapshot below shows the official main screen:

What happens when the cards are inserted ? Both ought to be used: if only the slot-1 one (SuperKey) is inserted, you will have two white screens, and if only the slot-2 one (SuperCard) is active, then your DS will run in backward compatibility mode for the GBA.
When both cards are inserted, you can see the SuperCard splash screen, but here one could not go further, as the microSD card was not inserted. See it in its case, on the right, the SD adapter being on the left. The SuperCard-like black object below the DS is just the default plastic filler to protect the console from dust.

Inserting the microSD card and rebooting is not really interesting, as this card is still empty.
We see nevertheless that our customized console works well and is almost ready to be used. Last step may be to upgrade the Supercard firmware, to benefit from improvements whose interest should be evaluated beforehand (beware to regressions though, check the assessment of other users first). To upgrade the firmware, download its targeted version from the official site (ex: microsd_eng_181.rar, for the 1.81 version), extract it with unrar (installed with apt-get install unrar) thanks to unrar e microsd_eng_181.rar. Put the result (my_micro_eng_181.bin) at the root of, here, your microSD card, before booting the DS with it. Then the firmware should be upgraded by selecting this file in the Supercard menu, and pressing the A key.
Buying things was quite easy. Now, let's try to use them ! First of all, let's learn what is available for our developments.
Even though Nintendo designed a low-cost handheld, the DS offers quite a lot of features:
two all-purpose processors (CPU):
Both can be running code at the same time.
The ARM (Arcos Risc Machine) family is quite widespread on embedded devices, and is known to be small, cheap and power-savvy. The Nintendo 64 offered roughly 100 MIPS, PlayStation 2 and PSP (PlayStation Portable) roughly 560 MIPS, GameCube 980 MIPS. According to some sources, the DS processors are under-clocked to save some power. Some people overclocked them, which involves quite some electronical skills and risks
The overall architecture (including the ARM, the rendering engine, the keys, etc.) took as a starting point the one of the GameBoy Advance. Both have an ARM7 (but the DS one is running at 33 MHz instead of 17 MHz), explaining partly the very good retrocompatibility of DS for GBA. More generally the DS hardware is quite close to the one of PocketPC devices. The performances are expected to be somewhat near the Nintendo 64 ones.
More low-level informations about the DS hardware:
There are two different ports in which cards can be inserted: Slot-1 and Slot-2. In both cases, cards are mostly ROM, but some of them have a small amount of non-volatile memory, usually EEPROM (notably Flash memory), to save some data (highscores, game saved, etc.).
Usual DS game cards are 33.0 × 35.0 × 3.8 mm, and weigh around 3,5 g. They can contain up to 128 megabytes, but in this case their transfer rates are smaller than the ones of 64-megabyte cards.
SuperKey and the other Slot-1 NoPass counterparts, apart from allowing the use of the Slot-2 devices, do not add any memory or feature. They just set the program counter so that it points to a memory location in the GBA slot, allowing programs to be run from storage there. They consume some power that reduces the console autonomy. A flashed firmware can be used instead, for the most daring.
There are several slot-2 add-ons (called linkers), which all provide their own set of features. From the ARM9 point of view, they can offer up to 32 megabytes of additional ROM (which can be actually RAM) and up to 64 kilobytes of SRAM, intended for game saves, preferences, etc.. Any other storage these cards may include cannot be seen directly by the ARMs.
Therefore these slot-2 linkers use their built-in RAM as a mock flash cartridge, i.e. as a cache fed from their hidden mass storage. There are various systems that upload in the ARM-visible 32-megabyte address space any desired chunk from any hidden mass storage. Some DS homebrew (ex: DSLinux) also use this additional RAM, though bus and speed issues make it less useful than the DS built-in memory.
More precisely, the GBA slot bus only supports 16-bit writes, which leads to issues when needing to perform 8-bit only write operations. As for speed, some people complained about Supercard's built-in RAM or some versions of microSD cards being too slow for some GBA games.
The SuperCard Lite is one of the most interesting linkers, as it fits well in the GBA port (it does not protrude when inserted in a DS Lite) and provides both the optimal 32 megabytes of RAM and an access to removable storage, here a microSD card.
Most of these removable cards are formatted in FAT (i.e. FAT16, not FAT32), which implies that no more than 2 gigabytes can be managed. Some linkers, like the R4DS / M3 Simply, may use FAT32 and take advantage of 4-gigabyte cards. Some other linkers are discussed in this PAlib tutorial
Note that a supposed work-around for a DSLinux bug would require making partitions strictly smaller than 2 gigabytes. This can be done from a PC running GNU/Linux thanks to, for example, fdisk /dev/mmcblk0, then deleting previous partition (d), creating two new primary partitions (1 and 2), first with only 1020 megabytes, the second with the rest of the space, then setting them to FAT16 (t option, with value 6 for filesystem type). You should then have partitions like:
|
mkdosfs -c -F 16 -n DS-homebrew -v /dev/mmcblk0p1 and mkdosfs -c -F 16 -n DS-storage -v /dev/mmcblk0p2. Using pmount and udev allows to mount these filesystems without needing a root access.
Software distribution on the DS is mostly based on ROM images, which can be downloaded on a PC as unique files. These files are read by the DS system, which see them as a kind of archive (a filesystem actually) containing possibly numerous files and directories.
Note that there are often more than one filesystem involved here:
There are several file extensions for Nintendo ROM. Each extension has a specific meaning, is associated to a specific executable format, and must be chosen adequately.
The sole purpose of ROM is to contain binaries (i.e. executables) for the two ARMs and, most often, application-specific data (icons, bitmaps, sounds, etc.), stored either as a unique flat file or as full filesystems, in one or more files, each filesystem containing in turn files and directories. Usually there is at most one filesystem. To be run from the GBA cart (slot-2), these ROM should include a loader that transfers them to the RAM.
The most frequent extensions are:
.nds (ex: myGame.nds):
this binary for the DS (slot-1) is used by official game cards and most emulators. It embeds a small header referring to a logo, a short description of the ROM content in several languages, followed eventually by the two executable binaries needed (a region dedicated to the ARM7, then a region dedicated to the ARM9), and optionally some appended data, for example a filesystem. The logo and description texts are used when booting a game card from the firmware, or when starting to download one over wireless multiboot: GBA Movie Player and the FlashMe + WMB method support .nds files.
This file format was primarily designed to be run from RAM filled from the slot-1 (ex: M3 and DS-X), hence it did not need any specific loader. Therefore old generation .nds do not have a loader at all, and an external one must be used when run from the GBA port. This loader is generally provided by the menu loader of the flash cart device.
Some newer .nds to be run from the GBA cart put nevertheless a loader (often ndsloader.bin, see our dedicated section), which they store into some unused space of the header. Sadly, many GBA flashers mess up the NDS header, thinking it is a corrupted GBA header. An external loader is then needed again
myGame.ds.gba): this binary for the DS is designed to run from GBA ROM. It is usually made of a small loader (to transfer thanks to the ARM7 the ROM content from the GBA card to the main RAM) contained in a 512-byte (GBA) header, then a .nds file, and zero or more appended data files. The code from the .nds accesses the appended data files thanks to reads from GBA ROM space. GBA flash carts, M3, and SuperCard support this. Some linkers may require the ROM to be renamed to .ds.ndsmyGame.ds.gba could be renamed preferably to myGame.sc.nds (see below)Some quite uncommon formats and extensions are:
.nds programs can be converted into ds.gba programs, i.e. ROM designed to run from slot-1 may run from slot-2. It involves prepending a loader, which may load the first appended .nds file, or allow selection of one of the .nds files.
The loader can be ndsloader.bin, which could be prepended that way:
|
The other way round (from ds.gba to .nds, i.e. from slot-2 to slot-1) usually cannot be performed if not already done by the author, because most often the application relies on specific data meant to be embedded, which is not supported with a .nds file.
There are some tools, such as the Supercard Magic Homebrew Patcher, that turns your .nds / .ds.gba files into a fixed supercard .sc.nds file.
Finally, most of the recent FAT-based homebrew applications need to be patched according to the relevant DLDI script, before being run. See next section.
Before rushing for the numerous homebrew softwares available on the Internet, one must understand the problem encountered with the various linkers, be them slot-1 or slot-2. This section therefore applies mostly to the ROM using the .ds.gba format, including .gba.nds and .sc.nds.
As each linker offers its own memory interface (the way it writes to its Flash memory), as soon as an application has to access to a memory provided by the linker, the homebrew has to be aware of the specific linker it will run with. Several solutions exist: the developer may build as many versions of his software as there are supported linkers (it becomes soon tedious and messy), or the end-user may use Chishm's DLDI, for FAT-based applications.
DLDI stands for Dynamically Linked Device Interface for libfat. The DLDI-aware software can be storage-agnostic. It has just to be built once, and patched according to the target linker it is to run with, before being transferred to the DS.
The point is that it is quite easy for the user to patch the software, and it frees the developer from having to take into account each and every linker variation on the market. Even linkers released years after one's software will be supported thanks to DLDI, with no additional efforts from the original author.
DLDI is needed whenever libfat versions more recent than Christmas 2006 are being used.
In practice, the user will need:
Our LOANI script can take in charge everything needed to use directly the DLDI tool on a Linux platform, see below. Otherwise Linux users just have to put the dlditool archive (here dlditool-belowlinux-x86.zip) and the device-specific patch file (here Sclt.dldi, it could be R4tf.dldi) in a new directory and prepare them. For example:
|
One just has then to use the DLDI tool to patch the software (here myGame.nds) according to its linker-specific patching specification: ./dlditool Sclt.dldi myGame.nds for example. Check that the tools returned that the operation was successfully performed. The patched ROM can then be used at once.
Sadly things are sometimes more complicated, for example some linkers perform auto-patching, and it may depend on their firmware version. For example starting from the 1.10 firmware version, R4 DS auto-patch their ROM.
One should also avoid with this R4 with prior firmware versions (ex: 1.09) to transform its .nds into a .ds.gba and then to DLDI-patch it: the resulting ROM will not even load on the R4, which is a slot 1, and thus is unrelated to the .ds.gba format.
Another option for Windows users is to install DLDIrc, which is configured once for all with a target linker and adds to the contextual menus for each selected DS ROM (the menu obtained with the right-click) the possibility to patch it.
More information about DLDI: read this section on Dev-Scene.
Finally, some homebrew make use of the SRAM (actually, a non-volatile RAM) that may be provided by a flash cartridge.
Even though most DS applications are to be run standalone (i.e. by themselves, not using any other specific operating system), one can nonetheless have its DS run a dedicated operating system (OS). Beyond the fun experience, it may allow for multitasking, or may just provide an environment familiar to the user, with useful tools and interfaces.
Should an OS be used, it will have to be executed as any other DS application. This OS will then be able itself to run the applications it is hosting. They may even run simultaneously, if the OS supports multitasking and if it does not monopolize for its own purpose too much the DS resources, not letting enough CPU or RAM for the hosted applications.
Among all other operating systems, homebrewers often favor Linux.
On the DS, this OS is provided thanks to DSLinux, based on uClinux.
It can be installed quite easily:
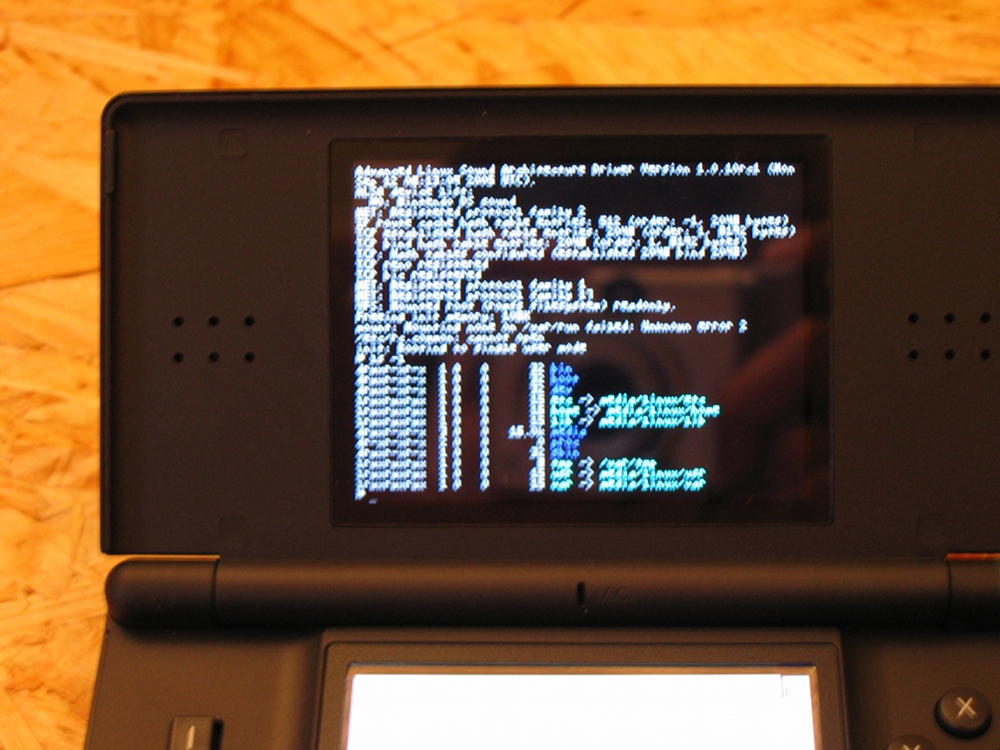
dslinux.nds with the adequate DLDI device patch (refer to our DLDI nano-guide)dslinux.nds and the linux directory extracted from the archive, including its own content) at the root of your SD cardSee DSLinux running, with the virtual stylus-based keyboard on the bottom screen:
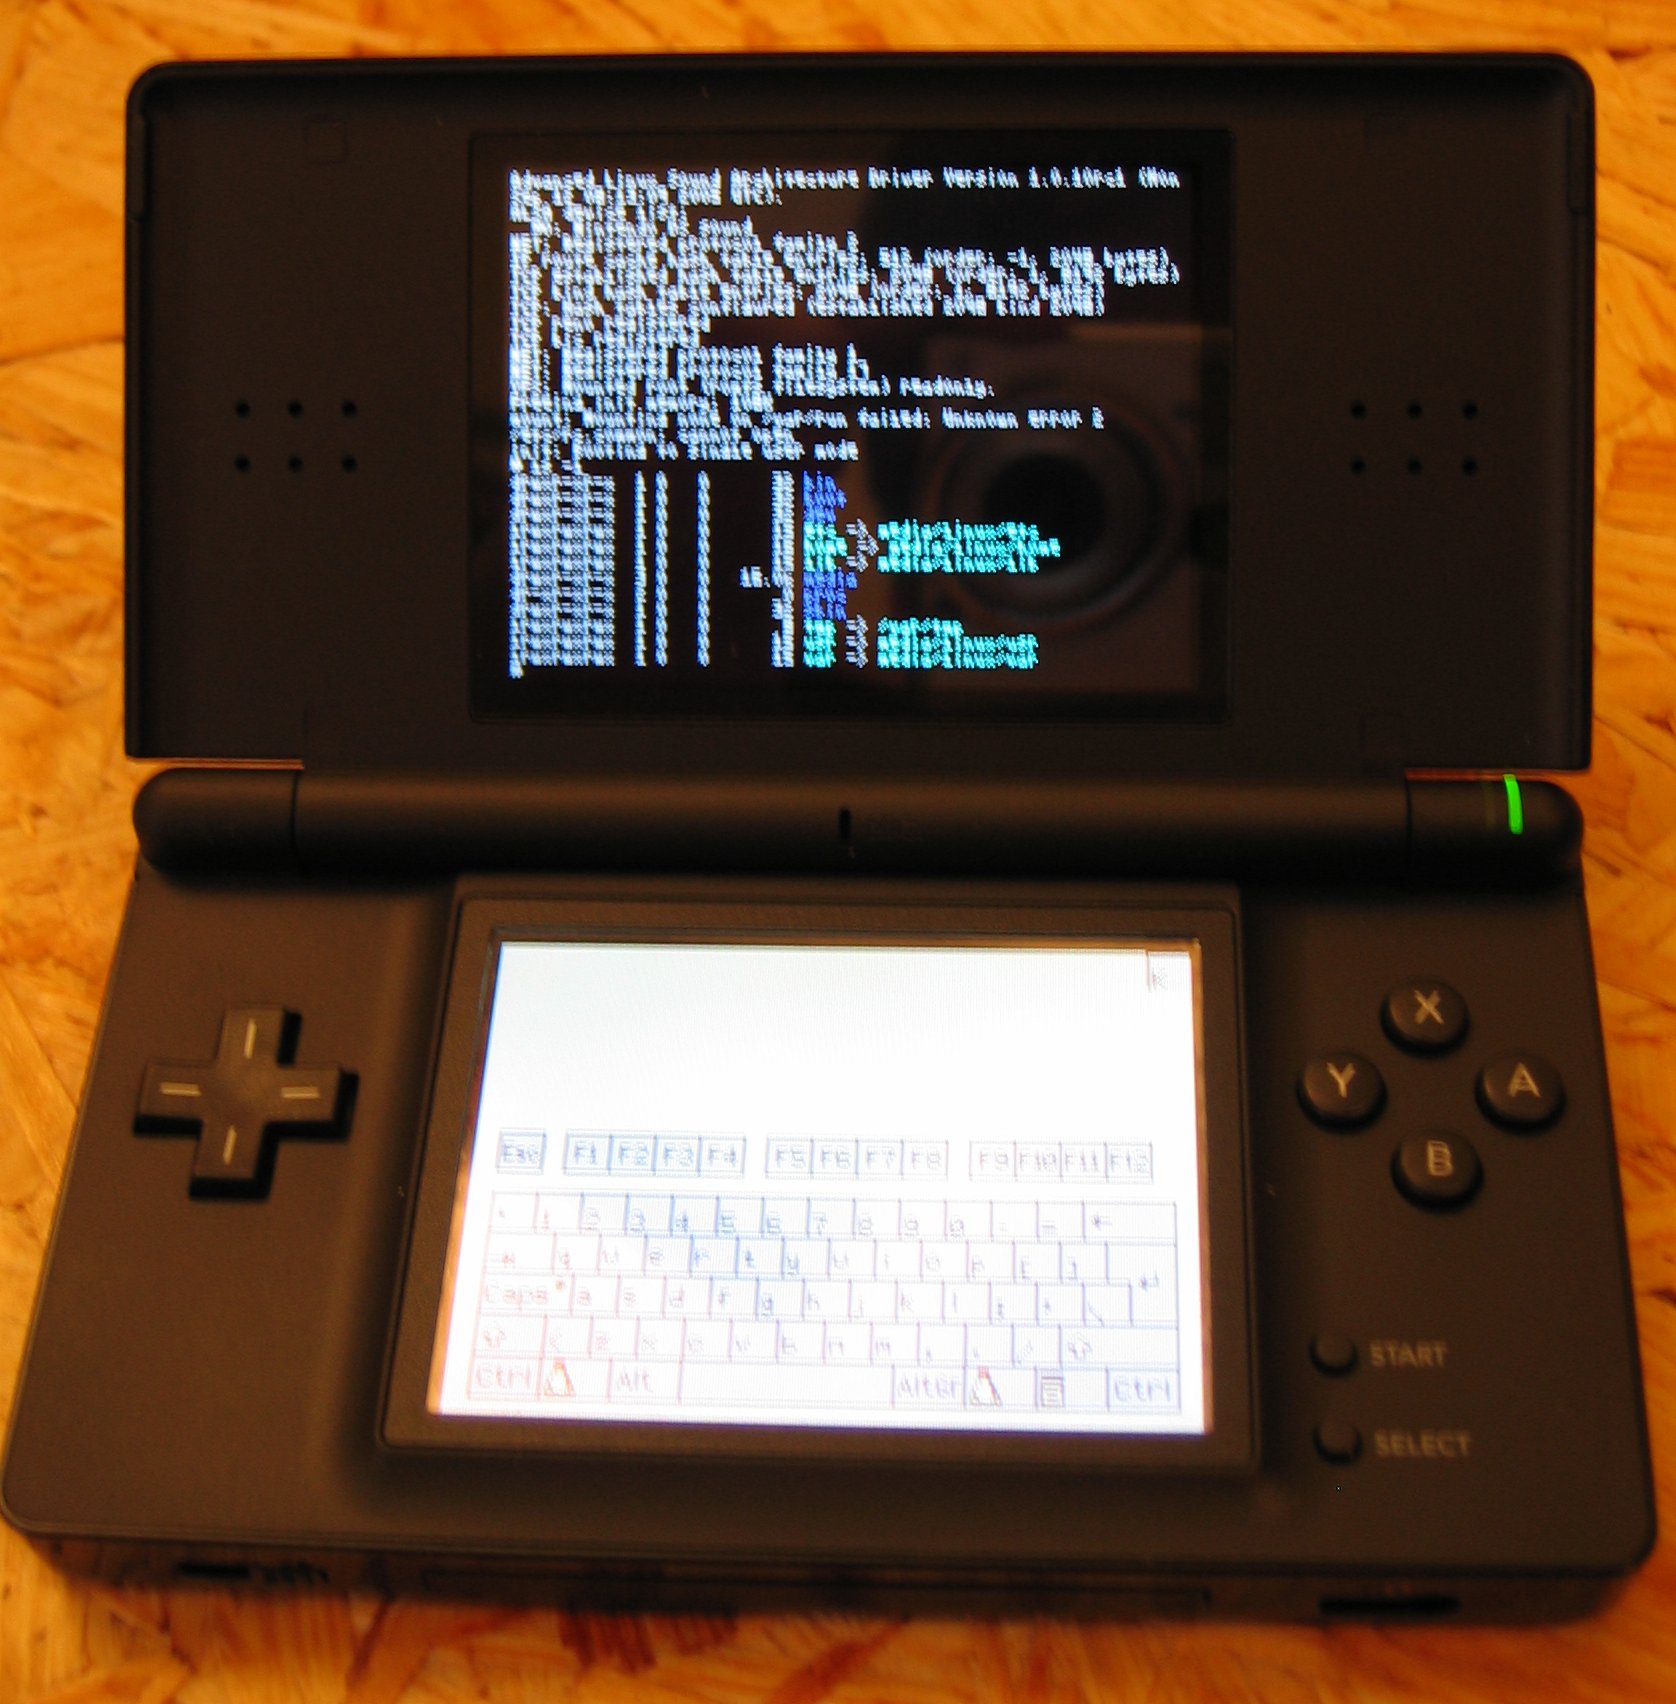
The terminal output is on the top screen:
See also:
Programming the DS is quite fun because it is rather down to the metal: being that close to the hardware, with no operating system, no drivers, no hardware incompatibilities (well, until we look at the flash carts) to take into account is a good pretext indeed to struggle against low level details. It is probably a very good way to practise embedded developments as well. Not to mention that having one's own programs working on a console is quite satisfactory.
ARM CPU are RISC (Reduced Instruction Set Computer) processors, as opposed to CISC processors (Complex Instruction Set Computer). Most ARM instructions are expected to be executed in one clock cycle, thanks to a simpler and constant structure.
For newcomers, one of the most disturbing specificities of the DS is its having multiple processors. They are expected to share the load: even if both ARM are rather general-purpose, the ARM9 should take care of most computation-intensive tasks, including graphic-related operations (it is the only one that can interact with the 3D rendering engine), whereas the ARM7 should concentrate on input management (touchscreen, most keys), wireless communications, audio output and any GameBoy emulation. As for the 2D/3D engines, they are dedicated as expected to visual rendering.
Roughly speaking, the ARM9 can be somewhere between 1.5 and about 4 times faster than the ARM7, depending on what task is involved.
ARM7 and ARM9 are often configured to use Thumb mode (16 bit mode), instead of the ARM mode (32 bit mode). The reason for this, in both cases, is memory space: ARM7 has limited program space, whereas ARM9 has limited instruction cache space. As for the 16 bit-wide bus accesses (there are several buses), ARM (32-bit) instructions would saturate the bandwidth and seriously decrease overall performance.
Some applications manage to rely on very tight 32-bit loops that fit in the ARM9 fast memory dedicated to instructions (ITCM, 32-kilobyte) or in the ARM7 dedicated fast RAM (IWRAM), so that they can benefit from a more "powerful" instruction set, for critical parts. Apart from the 32-bit memory regions fed by 32-bit buses, one should prefer Thumb (16-bit) instructions.
One can use the ITCM by either naming the file *.itcm.c or *.itcm.cpp or using the ITCM_CODE macro in the libnds headers. For example:
|
The latest devkitARM linkscripts and the default ARM7 core reserve the switchable IWRAM for ARM7 exclusive use. Nintendo official code also does this.
Neither CPU of the DS has a Floating Point Unit (FPU), so all floating-point operations must be emulated (not hardware support, they have to be done in software), which is very slow (so avoid by all means float and double variables). Most computations use therefore:
cos, sin, etc.). See this TONC section for more detailsAs a consequence of having two CPU, a DS ROM has to include at least two executables, one for each of the ARM (not mentioning application-specific data). At runtime the executables will have to work simultaneously, which involves often having to be synchronized and to share data.
Monitoring the ARM loads is not easy, even when using emulators. Profiling can be done via timers: one can start some hardware timers when a task starts, and then stop and read them when the task is done. That information is rather precise, and you can use it to provide a lot of information about how much of the CPU power is being used, even though setting it up is a bit tedious.
Some guidelines should be applied to write effective code for the DS. They include favoring when possible bit shifts (<< and >>), avoiding branching (if and switch replaced by arithmetic operations) and using & instead of % whenever possible. See also TONC section about ARM assembly.
Both ARM use the Little-Endian convention.
Hardware memory-mapped registers are a way for the CPUs to interact with other components of the DS, such as the sound or video hardware.
These registers behave like special memory addresses that can be read and/or written by the CPU, but the associated bits, instead of being actual memory, are in fact I/O ports of the chips the CPU is interacting with. These registers can be used for example so that the CPU sets the playback frequency of the sound hardware, or so that it reads which keys are pressed.
Most useful registers are defined by the low level library named libnds, to manipule abstract plain names (ex: DISPLAY_CR) instead of raw addresses (ex: 0x4000000).
Such addresses must be declared volatile, as the compiler cannot rely their value remaining constant between two accesses: registers are directly controlled by other chips that can modify them at any time, hence their value should not be cached as are usual bytes in memory.
Finally, in this case, using the preprocessor to set these adresses as immediate values (#define DISPLAY_CR XXXX .... DISPLAY_CR = aValue ;) instead of using constants (const unsigned int DisplayCR = XXXX ; *DisplayCR = aValue ;) might involve less operations (stored directly in the instruction opcode instead of being retrieved from memory), depending on the compiler optimization.
The main DS built-in memory, consisting of one big 4-megabyte block (sometimes named EWRAM, for External Working RAM) can be accessed by both ARM's, but one at a time. When both CPUs are trying to read main memory, one will have priority over the other (by default, the ARM7 has priority over the ARM9, with is a reasonable and safer setting), leading the other to wait until the first has finished its operation.
Regarding the ARM9, in the main memory there is generally its corresponding executable as well as most game data. Everything except its stack (placed in DTCM, see below) and the data declared to be read-only (placed in ROM space) is stored by default in these 4 megabytes of main memory, including application-specific code, non-const variables, global data, C++ constructors and destructors, etc. This memory is rather slow, at least compared to the ARM9 caches.
The ARM7 executable can be as well in main memory, but for performance reasons its code, together with its data, are often placed into the IWRAM (for Internal Working RAM, 64 kilobytes of fast RAM, 32-bit wide, that only the ARM7 can access). This is the case with devkitARM. Code has to be small enough to fit in this IWRAM.
From the point of view of the ARMs, the GBA cartridges are expected to be a ROM area of up to 32 megabytes. Linkers making use of removable media fake a 32-megabytes only memory by loading dynamically the relevant memory chunks from their mass storage media.
There are two memory banks of Tightly Coupled Memory (TCM) is the ARM9. They are high-speed memory, directly contained in the ARM CPU core.
The DTCM, for Data Tightly Coupled Memory, is a special 16-kilobyte memory area in the ARM9 which can be mapped to reside at various actual physical addresses. It is a lot faster than the main RAM, therefore the standard ARM9 linkscript places its stack in DTCM. Due to the small size of this memory region, local variables should be used carefully. One should avoid for example declaring too many of them (ex: local arrays) or having too deep recursions.
As for the ITCM, for Instruction Tightly Coupled Memory, it is a special 32-kilobyte memory area in the ARM9 which can be mapped to reside at various actual physical addresses. It is a lot faster than the main RAM, so it should be used for small (preferably 32-bit) functions that are computation-intensive and/or frequently called. For example, libnds uses that region to store the interrupt dispatcher.
Although these two tightly coupled memories (TCM) are faster memories than RAM, are internal to the ARM9, and are used for storing high performance code/data, they are actually completely separate areas of memory than the instruction and data (L1) caches of the ARM9.
So from the ARM9 point of view, the memory hierarchy is, from closest/fastest/smallest to farest/slowest/biggest: ARM9 caches (L1) > ARM9 TCM caches ("L2") > RAM and other memories.
Both ARM9 TCM seem to rely on 32-byte cache lines. As a cache line cannot be partially read or written apparently, special care must be taken when invalidating or flushing them.
Finally, see the memory layout diagram from Dev-Scene website to better understand the various buses between the various memories.
An interrupt (or IRQ, for Interrupt Request) is a way for a CPU to stop immediately the current execution path in order to run another function, called an interrupt handler, instead. Hence when a hardware or software interrupt occurs, the processor saves first some information so that it knows where to go back and in which state, then the handler associated to this interrupt for that CPU is called at once and, when that function returns, this CPU continues executing the piece of code it was executing before it was interrupted, as if nothing had happened.
Therefore interrupts allow to perform tasks that should not wait, either because otherwise they might be missed (ex: a keypress described in a hardware register) or because the application must react directly to them (ex: a Vertical Blank Interrupt that would trigger rendering, see below).
Interrupts allow also to use the CPU sleep mode, since they provide a way of waking it up as soon as it becomes needed again, thanks to a BIOS routine. In this low power mode, the ARM9 stops processing instructions and powers down some memory banks to save battery charge. There is an ARM instruction named SWI (for SoftWare Interrupt) with one numerical parameter that means: enter the SWI handler and pass that value in order to know which interrupt or combination of interrupts the CPU should be waiting for, from now on.
Helper libraries, including libnds, offer higher-level interrupt management. If most of the program is in interrupt handlers, then the CPU may sleep most of the time, preserving the charge of the DS batteries. Note that interrupt handlers are meant to be executed in a short time though, as otherwise they might be interrupted themselves. Too many cascading long interrupts might prevent the DS from ever returning to the main interrupted code.
By default when an interrupt is triggered, the CPU jumps to the standard BIOS interrupt routine, a function which is stored in a special memory address that we can write to. By storing here a pointer to one of our own functions, we can cause the interrupt to be processed by an user-specified function, i.e. we can define our custom interrupt (IRQ) handler.
More information on interrupts in general can be found in this TONC section.
The DS supports 23 different hardware interrupts, named here according to the libnds convention (unless specified otherwise, these interrupts are available both for the ARM7 and the ARM9):
DISPSTAT, compared to REG_VCOUNT) were displayed (IRQ_HBLANK / IRQ_VBLANK / IRQ_VCOUNT)IRQ_TIMER0 / IRQ_TIMER1 / IRQ_TIMER2 / IRQ_TIMER3)IRQ_NETWORK / IRQ_WIFI ) [ARM7-specific]IRQ_DMA0 / IRQ_DMA1 / IRQ_DMA2 / IRQ_DMA3)REG_KEYCNT (IRQ_KEYS)IRQ_CART / IRQ_CARD / IRQ_CARD_LINE)IRQ_IPC_SYNC / IRQ_FIFO_EMPTY / IRQ_FIFO_NOT_EMPTY)IRQ_GEOMETRY_FIFO) [ARM9 only]IRQ_SPI) [ARM7 only]IRQ_LID) [ARM7 only]
Once the IRQ subsystem has been initialized (irqInit), handlers can be associated to interrupts (irqSet, irqClear). libnds provides a default overall interrupt dispatcher that can be overriden (irqInitHandler).
Interrupts can be enabled/disabled separately (using REG_IE, or irqEnable, irqDisable), and temporarily disabled as a whole (REG_IME).
The ARM7 stores the addresses of its interrupt handlers in a hardcoded memory location, whereas the ARM9 defines these addresses relativey to the DTCM.
Both CPU can trigger interrupts to each other (if the ARM9 allows it). It is convenient to send a notification to the other CPU when, for example, there is data for it waiting to be read on a shared area in RAM, once the calling CPU has finished filling it.
The DS screens are updated neither as a whole nor permanently: the graphics hardware draws pixels one by one, from the top left to the bottom right of each screen, line by line. It then waits for a while (a fixed duration) before starting to draw again.
If the framebuffer (the place in memory where the pixels are stored) is modified during the redrawing process, the user may see visual artefacts in the form of partly-updated images, the top-left part being rendered according to the previous state of the framebuffer, bottom-right with the current one.
During a short duration after a line is drawn, during a longer one once a full screen is rendered, the hardware remains idle. These moments can be used to perform safe rendering: no partial redraw is to be feared then.
Two special interrupts are regularly fired, so that the programs can use these two favorable periods: one, the Horizontal Blank Interrupt, occurs whenever a line has been rendered. Your program can use this first idle duration to perform rendering operations. The other one, more famous, is the Vertical Blank Interrupt (VBI), that is fired once a full screen has been redrawn. Your program should use this longer duration to perform at least framebuffer-related operations, while the hardware moves from the last line back up to the first line. This idle stage is called Vblank, as opposed to Vdraw, the screen refresh time.
At both screens are refreshed at 60 Hz, the period between two VBI is 16,7 ms long. See more information about the GBA, which still applies here. The VBI is called also vsync, since it allows for vertical synchronisation.
Note that all other operations (input reading, sound output, application logic, etc.) can be performed regardless of these two interrupts. But the VBI, beyond its use to avoid visual artefacts, provides too a hard real-time 60Hz time-base. This time base can be used to schedule operations on a regular basis. Timers are useful for that task too.
Keys can be read thanks to several methods, including the interrupt-based one. In this case a specific IRQ handler is registered. This handler will be triggered indeed when a key is pressed, but it will not be called when the key is released, which reduces quite a lot the interest of this method for key handling.
Beyond screens and sometimes keys, FIFO, IPC and timers make heavy use of interrupts.
These SWI (for SoftWare Interrupt) are triggered by the program itself, thanks to the ARM instruction named swi, and result in a DS BIOS function being called.
One would prefer to use pre-made encapsulations for these BIOS calls, for example the ones provided by libnds (ex: swiSoftReset).
The DS supports 25 different software interrupts, they are described in the libnds BIOS section.
The full name of this processor is ARM7TDMI, meaning it is an ARM 7 core (a.k.a. ARM v4), which can read Thumb (16-bit) code, has a Debug mode and a fast Multiplier. On the DS it has neither an instruction cache nor a data cache, but it is a bit compensated by the fast memory it owns, the 64-kilobyte IWRAM linked with a 32-bit wide bus.
There are also two 16-kilobyte WRAM banks that can be assigned independently to the ARM7 or ARM9, with a 32-bit wide bus in both cases. The two ARMs cannot access these banks at the same time. Commonly, both banks will be mapped to the ARM7 (devkitARM defaults): as they form then a continuous block with the ARM7 IWRAM, this processor is effectively given 96 kilobytes of fast memory.
The ARM7 is the only CPU that can be used for controlling the touchscreen. Most applications use boilerplate code that sets up an interrupt handler for the already mentioned Vertical Blank Interrupt (VBI). Not for rendering purpose here, but for synchronization, so that the interrupt handler dedicated to ARM7 input reporting can be scheduled regularly. The ARM7 boilerplate code gets the value of the touchscreen parameters and stores them in a data structure the ARM9 can access to.
The ARM7 is also the only CPU that can make use of the microphone, the sound playback, the wireless communications and the real-time clock.
Depending on a data being const or not, the linker will place that variable respectively either on an average memory rather unconstrained or in IWRAM, which is the fastest but one of the smallest. Therefore each time one forgets to specify the const qualifier for an actual constant, it may use unnecessarily the most researched IWRAM instead of low-end memory.
The free toolchain devkitPro includes a default ARM7 program to handle basic tasks like managing interrupts, reading the touchscreen, the microphone and the realtime clock, performing very simple sound playback, etc. It is the arm7.bin file discussed in our building section. Usually there is no need to write custom ARM7 code. The standard Makefiles include this default ARM7 program.
Due to its superior power compared to the ARM7, the ARM9 is the main processor and as such will take in charge most of the work. Most of application-specific code is expected to run on it.
The ARM9 uses two additional built-in caches (beyond the usual CPU L1 caches): one for the instructions (ITCM, 32 kilobytes), the other for the data (DTCM, 16 kilobytes). Each is accessed thanks to a dedicated 32-bit wide bus. Both are caching accesses to the main memory and increase the ARM9 performances a lot, at the expense of a small additional level of complexity: as neither the ARM7 nor the DMA circuits are aware of these two caches, care must be taken not to create inconsistencies with their view and the one of the ARM9.
To make a better use of these caches, various primitives are provided to ensure they stay in sync with the main memory. This includes a mirror of main memory that is not cacheable (02400000-027FFFFF), and a way of flushing the data cache (DC_FlushAll).
A single ARM9 main() function defines usually:
In GBA mode the ARM9 is not powered, only the ARM7 can be used.
As each ARM has specific abilities (ex: the ARM7 is the only one that can access the hardware for sound and wireless), they have to communicate one way or another to send to the other ARM commands to be executed on the sender behalf.
The ARM CPU can communicate thanks to IPC (Inter-Process Communications) based on a set of registers managed thanks to a (possibily bidirectional) FIFO (First In, First Out) data structure. It corresponds actually to message queues with an asynchronous communication protocol.
Communication between ARMs is tricky: beyond the classical issues of synchronization of the concurrent accesses (parallelism between the ARMs), one has to keep in mind the ARM7 is not aware of the ARM9 data cache (DTCM), which may lead to inconsistencies if using the main memory to share data.
One solution is:
0x02400000-0x027fffff, add 0x400000 to the normal main RAM address to get to the uncached mirror), even if thus the ARM9 access to the data will be slower. An alternative solution to the mirror would be to flush/invalidate the cache manually, although this approach does not seem 100% reliable
Note that as soon as IRQ and/or inter-ARM accesses to shared variables in main RAM are involved, one has to rely on variables declared volatile, so that the compiler does not suppose it can avoid sometimes avoid to read from main RAM. As code for the DS is usually compiled with deepest optimisations activated (ex: -03), these issues must be managed.
A pointer to a volatile variable of type T should be declared as volatile T * (ex: data in main RAM). If the pointer is itself volatile (ex: set from an IRQ), then declare it volatile as well: volatile T * volatile. Despite these safety measures, the data cache will still cause problems though.
The shared memory could also be located in the so-called IPC region, which starts at the address 0x027ff000. Its purpose is to provide a safe memory area dedicated to shared variables. The usual allocators (ex: malloc, new, etc.) do not readily provide ways of specifying the target address (for in-place allocation in this area), so a given structure has to be mapped directly to the relevant part of this IPC region.
If using libnds, then this library will reserve the beginning of this IPC for its inner workings. This is done thanks to their TransferRegion structure. Thus user data should start no before than (uint32)(IPC) + sizeof(TransferRegion), to avoid memory corruption.
Note that the link scripts for both ARMs leave only a 4 kilobyte-space for this IPC area: the size of main RAM is restricted 4MB - 4KB, then the IPC struct is defined as address 0x027ff000, i.e. 4 kilobytes before the end of the non-cached mirror of main RAM. The libnds IPC struct itself is pretty small (less than 500 bytes), but user variables (and, possibly, all other libraries used besides libnds) may run over it, if larger than the remaining space (about 3 500 bytes).
Finally, as already explained, memory areas in the main RAM (not in the IPC area) can be used instead of this so-called IPC region, provided the usual precautions are respected (allocated from the ARM9, accessed from the non-cacheable mirror or with a DTCM management) and provided a means of notifying the ARM7 is used (ex: the hardware FIFO).
Commands can be described by the ARM9 in a data structure for the ARM7, for example a C union or a non-abstract C++ class inheriting from an abstract command class. These commands should specify the requested action (ex: play sound) and its associated data (ex: a pointer to the samples stored in main memory). A set of commands can then be kept in shared memory, accessible by the ARM7 and ARM9.
The command set can be implemented thanks to a circular C array or a C++ (FIFO) std::queue that would be instanciated into the shared memory area, after the libnds IPC region, i.e. after the libnds-defined IPC starting address at the IPC symbol incremented of an offset equal to the length of TransferRegion.
So the ARM9, after having initalized the queue, is expected to place a command in it whenever needed, whereas the ARM7 is expected to poll regularly the queue (ex: thanks to the VBI) in order to gather and execute commands.
This IPC method has three drawbacks. First it is only one-way: the ARM7 cannot send commands or results to the ARM9, as no protection against concurrent accesses is available here. Second it requires the ARM7 to perform polling, at the expense of uselessly burnt CPU cycles. Third it has to fit in the tiny IPC region.
See Chris Double tutorial #6 for more details about custom-made IPC.
The DS provides a built-in interrupt-based FIFO queue. Therefore the ARM7 can receive immediately interrupt notifications, instead of having to poll, which would be rather inefficient. The FIFO handles concurrent accesses in hardware, which allows fast reliable bidirectional communications. This queue can only hold 16 items (32-bit int, that can be taken as integers or as pointers to user-defined data) on each side, so the other processor should be receiving these items in a timely manner.
Each CPU has a queue which it can put data on. The other CPU can receive this data by reading from a register, or thanks to an interrupt. It will get the oldest item that the other CPU put on the queue. A kind of small application-specific protocol could be specified to manage the queue exchanges.
See Chris Double tutorial #7 for more details about hardware-based IPC, and also our Ceylan-based generic high-level IPC system.
Programming the DS involves performing numerous data transfers, for graphics, sounds, application data, etc., from various regions in address space to various other regions (memory banks, slot-1, slot-2, IWRAM, etc.).
These transfers can be achieved thanks to various means, each with its own forces and weaknesses. Starting from the most often favoured transfer method to the least in case of a significant transfer:
although "only" up to four of them can run simultaneously, DMA transfers (open to both ARM, ex: dmaCopy) are interesting because they offset this load from a CPU. They run in background and trigger an interrupt when having finished, letting the CPU perform other tasks in the mean time. There are not necessarily the fastest of all transfer methods, but this is more than compensated by their parallel execution feature.
A drawback is that, as long as the DMA transfer is running, both CPU will be locked off the bus to the main RAM, to prevent the CPU and the DMA controller from trying to access the bus at the same time, causing a collision.
Thus the ARM9 should execute from its "second-level" instruction cache (ITCM) reading/writing data from/to its "second-level" data cache (DTCM), otherwise it will be frozen, waiting for the bus. dmaCopy cannot access the DTCM region of the ARM9, which is where the stack is placed. Thus if the source of a DMA transfer is the main RAM from the ARM9, the DTCM must be flushed beforehand. Some interference between DMA transfers and interrupt handling have been reported, when in doubt swap to memcpy to see whether it improves stability.
As for the ARM7, apparently, even when executing from its IWRAM, it will be frozen
memset for setting instead of copying)swiCopy, but has higher interrupt latencyswiFastCopy, suffers from a bug apparentlyFirst, the DS can run in different modes, including the GBA Mode (ARM9 not used), sleep (for the ARM7), stop, halt, etc. The DS can be woken up from various IRQ (Interrupt Requests):
Second, most subsystems of the DS can be powered independently: sound speakers, Wifi, LCD screens, the two 2D engines, the 3D rendering and geometry engines.
Selective activation is useful notably to save energy.
The two screens can be managed separatly, or considered as two halves of a taller single screen. They can be used also with the DS being rotated of 90 degrees, on its side (portrait mode), like an open book.
Most of the informations related to the graphical rendering are stored in the VRAM, for Video RAM. Its size is 656 kilobytes, and it only accepts 16 or 32-bit writes (no 8-bit writes allowed).
2D/3D rendering requires images, geometries, textures, etc., see our data storage section explaining how to access the resources needed by your application.
If the rendering takes place while the screens are redrawn, then the user will see on its screens images partly updated, leading to unwanted visual artefacts. The solution is either to modify the screen content only between two redraws or to use page flipping.
The first approach can be implemented by waiting for the aforementioned VBI (Vertical Blank Interrupt) and performing the rendering only in its handler, i.e. in hard real time. One has just to ensure that rendering does not last more than the Vblank, which is rather short. This is not always possible, except for the most simple renderings. Otherwise page flipping should be preferred.
As there are many technical choices that lead to poor trade-offs, one may benefit from some thoughts we gathered about organization and toolchain for graphical assets on the DS.
When rendering is not trivial, this task might not be short enough to fit in the Vblank. Page flipping (not to be mixed up with the more expensive double-buffering, which involves an extra screen copy) is a method that consists on rendering in a screen buffer while the hardware, simultaneously, displays another buffer. At each VBI, buffers are exchanged so that both tasks can continue. Page flipping is thus a way of eliminating nasty artefacts like tearing in animations. Palettes may have to be flipped as well as bitmaps.
Page flipping allows to have a lot more time to render than when rendering only during Vblank: here 16 ms (at 60 Hz) are available.
In software you manipulate a main screen abstraction (main rendering core), that can be mapped either to the top actual screen or to the bottom one, and a sub screen (sub rendering core), which will correspond to the other hardware screen. They can be swapped at any time thanks to lcdSwap().
Compared to the sub core, the main core offers following additional features:
Both screens can be seen from software like 2D Cartesian coordinate systems, the abscissa (X axis) ranging from 0 (left) to 255 (right), the ordinate (Y axis) ranging from 0 (top) to 191 (bottom).
Both cores can be set in various video modes, each with different capabilities and features. The sub core has only five different video modes, whereas the main core is more powerful: it is able to reallocate more VRAM, and has the ability to render basic vertex 3D (with a 2048 polygon limit) and several vertex shaders, such as Toon Shading. The main core also has an extra video mode called Mode 6 for large bitmaps. In addition, the display capture device is capable to take a capture screen only from this core. See LiraNuna's 2D tutorial for more details.
In a given screen mode, pixels are described according to a specific pixel format, that dictates their layout in memory:
xBBBBBGGGGGRRRRRDirect color modes are simple, but use a lot of memory space when stored and a lot of bus bandwidth when blitted, compared to palette-based ones with 4-bit or 8-bit index, which are therefore often favoured.
There are libnds-provided macros (ex: RGB15) that help defining pixels according to specific formats. See Chris Double tutorial #2 for more details.
Depending on the video mode, each rendering core will retrieve its video-related informations (ex: bitmaps, sprites, tiles, textures, maps) from hardcoded regions defined in overall memory address space.
These are address regions (i.e. a lower and higher addresses), but by default at these adresses there is no actual memory: the engines have almost no memory on their own (except for sprite attributes and base palettes).
You therefore need to map predefined chunks of actual video RAM into these specified address regions for the cores to use them. Each of these chunks is called a bank, there are nine of them, labelled VRAM_A through to VRAM_I. Each of these has a particular size and is best suited for specific purposes: choosing the appropriate layout and settings is all the more important that memory space is tiny.
The banks are:
| Bank name | Bank size (in Kilobytes) |
|---|---|
| VRAM_A | 128 |
| VRAM_B | 128 |
| VRAM_C | 128 |
| VRAM_D | 128 |
| VRAM_E | 64 |
| VRAM_F | 16 |
| VRAM_G | 16 |
| VRAM_H | 32 |
| VRAM_I | 16 |
Total is thus 656 kilobytes. See also the VRAM bank mapping from Dovoto's tutorial.
The system has two 2D engines, one per screen. Each screen can be put into a variety of different modes, with different feature sets. These engines are each quite similar to the Game Boy Advance's single 2D engine, though more powerful.
The VRAM banks previously mentioned are to be mapped according to the expected layout for 2D memory, which is mostly made of:
As for sprite attributes, as said previously each 2D core has its own built-in dedicated memory, which contains 128 entries (one entry per possible sprite). Each entry is made of four 16-bit attributes, storing the size, shape and location of the associated sprite. Up to 32 out of the 128 entries can correspond to affine transformations (named rotsets), whose additional attributes specify rotation and scale. Hence up to 32 rotsets can be defined, but more than one sprite can be associated to a given rotset.
Base palettes have their own per-engine memory too. Each 2D engine has two base palettes, one for the background, one for the sprites. Each base palette contains 256 16-bit color entries, in x555 BGR format.
See also the memory layout as seen from the 2D engines, taken from Dovoto's tutorial.
Each video mode has a number of backgrounds (BG) that can be used. A background is a surface that, when drawn upon, displays on the hardware like a layer. Modes that have multiple backgrounds allow these backgrounds to be overlayed, so that they are drawn on top of each other. This, and the support of per-pixel transparency, enables for example a background with text to be overlayed on top of a background displaying an image.
Backgrounds are opposed to sprites: the formers take care of the decoration, the environment often static that may take the entire screen, whereas the laters represent the living entities (small moving objects, like animated characters).
Some backgrounds behave like framebuffers (per-pixel software rendering), others are tiled. Such backgrounds, in a very similar way to palettized surfaces (that contain, instead of pixels, a palette and color indices referring to that palette) are composed of a set of tiles (the "palette") and a map, which for each cell of its grid tells which tile should be placed here, as if the screens were divided into a series of 8x8 squares. Expressed in tile units, each screen is thus 32x24.
More precisely, instead of being a kind of array of pixels, a tile-based background is a kind of array of references to tiles, each tile being a fixed-size array of pixels (a rectangle 8 pixels wide and 8 pixels tall, i.e. 64 pixels). The 2D engine will thus sweep the background as if it was a grid of tiles: for each cell of the grid, it will read in the map array the corresponding tile entry, and will blit the tile being mentioned in that entry to the cell. Hence tiles allow to perform a full pavage of the background.
The DS excels at tile-based rendering, which is the way to go for most games, as it is hardware-accelerated, whereas framebuffer access implies slow software rendering. A few basic tiles can create complex displays quite nicely.
There are three types of backgrounds: Rotoscale (a.k.a. Rotation), Extended Rotoscale (a.k.a. Extended) and Text. See the table of graphic modes from Dovoto's tutorial.
Rotoscale backgrounds are tile-based backgrounds (or surfaces, in SDL-like language) that can be manipulated (affine transformations: 2-axis scrolled, scaled in or out, rotated, sheared, thanks a transformation matrix) and displayed directly on screen, all in hardware, i.e. with little overhead for the CPUs, no additional VRAM copy and no specific developing effort (it only involves setting some registers). They can be smaller or bigger than a screen, in which case only the relevant parts will be shown (clipping).
Such regular rotoscale backgrounds use 8-bit tile entries. They can therefore reference only up to 256 different tiles. Each tile entry designates simply the number of its tile into character memory.
Extended Rotation Backgrounds (ERB) are more powerful versions of Rotoscale backgrounds: they support larger tilesets (1024 instead of 256, which induces larger maps), they support more palettes (256-color ones), and they can operate in bitmap mode (linear frame buffer) as well as in tiled mode.
As ERB backgrounds can be accessed (read and write) like the framebuffer, as they provide additional hardware capabilities, they tend to make the framebuffer modes useless.
To demonstrate scrolling around an image, one may use for example a 256x256 background size (in pixels), with 16-bit color tiles (with one alpha bit). That background would be larger than the DS screen (256x192), but it would use only 128 kilobytes to store the image. VRAM_A could be chosen for that.
Finally, hardware scrolling can be of great help to implement parallax scrolling (a fake sense of depth), when having multiple backgrounds sliding at different paces.
In tile mode, ERB use the same 16-bit tile entries as the text backgrounds (see below).
They are general-purpose tiled backgrounds. A text background is made of:
2^10=1024), and the 6 remaining bits (the control bits) record the tile attributes (see below)The DS tiling engine is quite feature-rich: beyond displaying tiles as they are, it can flip them (horizontally and/or vertically), and use different palettes to render the same tile, for example for palette-based animations. These per-tile informations are stored in the aforementioned 6-bit attributes of tile entries (the control bits): one bit (on/off) for each flip (horizontal/vertical), and 4 bits to designate one of the 16 sub-palettes.
So with text backgrounds you have nothing like an overall screen buffer that could be written at the pixel level: you can just manipulate tiles and maps, and it is the DS hardware that will read it to recompose the screen.
The pixels of a tile are described as color indices taken from a palette. As palettes here are a collection of either 256 colors or 16 sub-palettes of 16 colors each, there are two color modes for tiles in text backgrounds:
In the 512-kilobyte VRAM (Video RAM), there are locations dedicated to the storage of map data, in map bases (2 kilobytes each), or tile data, in tile bases (16 kilobytes each, a.k.a. charblock). Map and tile bases share the same region in VRAM, whose layout must be carefully planned. Usually one counts in map base units, for example the size of a tile base is 8 map bases.
As maps can be placed anywhere in the first 64 kilobytes of background memory, and tiles anywhere in the first 256 kilobytes, a good practise may be to reserve the first 16 kilobytes of background memory to your maps (hence 8 map bases, which therefore correspond to the first tile base), and, starting at tile base #1 (instead of #0), to use the remaining 496 kilobytes (31*16) to store your tiles.
As each tile base occupies 16 kilobytes, in 256-color mode there can be no more than 256 tiles per tile base (16*1024/(64*1)), whereas in 16-color mode there can be 512 tiles per tile base (16*1024/(64*0.5)).
The tileset of a given map can refer up to 1024 tiles: more than a tile base can be referred to by a map base. Therefore in 256-color mode, there can be up to 4 tile bases per map base (1024/256), whereas in 16-color mode there can be up to 2 tile bases per map base (1024/512).
Map bases always have 32×32 tile entries. By default, the DS will be using a 32x32 tile map, a size of 256x256 pixels. It would be exactly as wide as a DS screen, and taller: screen height is 192 pixels, therefore there would be 64 extra rows.
When wanting to perform (hardware) scrolling, one has to have a logical screen bigger than the rendered screen, in order to load in the background the neighboring parts before showing them. To create bigger backgrounds, you need to use several map bases, and to choose one out of the three other sizes: 32x64, 64x32 and 64x64. As explained in TONC, maps using several map bases cannot be accessed as a unique array, per-map base accesses still has to be performed. Computing the address of a tile entry requires therefore a little more efforts.
More information on regular tiled backgrounds can be found in TONC and in Dovoto's tutorial.
The framebuffer mode, or bitmap mode, is the easiest to directly draw to, but the less powerful of all modes. A framebuffer is a mode where the screen is mapped directly to a portion of main memory. Pixel informations written to this memory area in 15-bit direct color format will immediately result in their appearing on the screen. Therefore to plot a pixel, whose color is defined in a 16-bit integer c, at screen location (x,y), one just would have to write c at FramebufferBaseAddress + y * ScreenPitch + x, ScreenPitch being equal here to the screen width (no extra per-scanline bytes), 256.
If it remains quite simple, it does not offer the various useful features supported by other modes, such as sprites, scrollings, etc., not to mention 3D primitives: with the framebuffer only software rendering is performed (raster graphics). And only the main screen can use this framebuffer mode.
Hence a good practise is to prefer sprites and tiled backgrounds over bitmap modes. Very few 2D games do not rely on the hardware acceleration.
See Dovoto's tutorial about software-based line rendering using the Bresenham algorithm.
Finally, the graphics to render are most of the time available first in general-purpose formats (png, jpeg, etc.). They have therefore to be converted into data that the DS may use natively, i.e. split into the appropriate palettes, tilesets, etc. This can be either precomputed (done at build time, once for all) or done at runtime, which may allow to benefit from the features of the general-purpose format, for example compression.
Tools include grit (GBA Raster Image Transmogrifier, new name for git) and gfx2gba (Linux port available) which, when given a file in 16 or 256-color PCX, TGA, SPR, BMP or TIM formats, can create a binary tileset (*.raw) with 8x8 tiles), a binary background map (*.map) and a 256-color palette file (*.bin):
|
One may use The Gimp to preconvert PNG and JPEG files to formats recognized by gfx2gba. There are also Python-Fu scripts for that tool, to convert images to formats appropriate for tiles and sprites. See this guide for further hints to use The Gimp with regard to the DS.
Another tool useful to convert sprites, backgrounds and textures is PAGfx, which has been ported to GNU/Linux (download here). Its user just has to update PAGfx.ini and then to run PAGfx.exe that will read it and perform its image manipulations. Prefer for example the magenta colorkey (transparent color). This will result in various .h and .c files to be used when building, so that the corresponding resources are embedded. This implies linking these data directly in the executable, which is rarely the best way to manage resources.
More information about PAGfx can be found in this section of PAlib tutorial.
Other tools include GbaGraphics, by Brunni, which works when run from Wine.
These converted graphics will then have to be stored so that the DS application will find it.
Setting up a full toolchain for graphical assets is a difficult task, we described our approach here.
Tools include gba-jpeg.
When developing a decoder, to read easily headers (notably fixed-size ones), one may use in-place structure reading, known as (packed) overlay: it maps directly a sequence of bytes being read from file into a C structure, provided the compiler is instructed about how data is padded.
See also: Dovoto's tutorial about BMP decoding, LiraNuna's 2D tutorial, and Chris Double tutorial #10 for more details.
Sprites are small (8x8 to 64x64 pixels) graphical objects that can be transformed independently from each other and can be used in conjunction with either bitmap or tiles background types (which are mutually exclusive). Like backgrounds, sprites are built out of tiles, but backgrounds and sprites cannot share tiles. The tiles available for sprites are stored in Object VRAM, or OVRAM for short. They can be shared between different sprites, thus changing them will change them for all sprites (ex: when performing animations). The same is true for palettes.
OAM means Object Attribute Memory. This is where you control the sprites, which are managed by the DS hardware. At most 128 sprites are supported at a time, per rendering engine. Each of them has three so-called attributes (hence OAM), including its onscreen position (top-left corner of the sprite) expressed in pixels (hence sprites, even if they are made out of tiles, can be blitted to any screen location, not only on tile intersection).
This position ranges between 0 and 511 for the abcissa, and between 0 and 191 for the ordinate. This means the sprite can be out of the screen bounds (256x192). Coordinates wrap around: a 512 abcissa is managed as if it was 0, same thing for a 192 ordinate. Other per-sprite informations in OAM are shape, size, requested flipping, and if a rotset is used. If yes, its number, in 0..31, is specified. In each rotset, a transformation matrix is specified, with zoom factors and rotation angle.
Generally speaking, the OAM is not directly read or written to, as during the VDraw this memory area is locked and cannot be accessed. This is less a limitation than a protection, as visual artefacts could be seen if the OAM was changed during screen update. Therefore programmers usually relies on an OAM double buffering: they have their own shadow copy in RAM of the OAM attributes, they can modify it at any time (including Vdraw), and during Vblank they update the real OAM from their shadow copy.
There are three available color modes for sprites:
A special color can be elected in each of the color modes, the colorkey, so that the pixels that exactly match that color are not drawned at all: they will be fully transparent, which enables to have sprites which do not color all their bitmap area, i.e. who can have a non-rectangle shape. For example a disc sprite should not overwrite the background inside its clipping rectangle but outside of the disc: in this area we need to view the background behind it. A good and quite usual colorkey choice is the "pure" magenta (full red, full blue, no green), as it is seldom used for real colors.
As for the size of sprites, each dimension can be either 8, 16, 32 or 64 pixels (i.e. 1,2,4 or 8 tiles), but if a dimension is 64, then the other must be either 32 or 4 (not 8, not 16). See the corresponding table from PAlib documentation.
Each sprite must be given a number in 0..127 that identifies it, and that defines as well its priority in its background. The smaller a sprite number is, the highest its priority will be: in a given background, a given sprite will be on top of the sprites with higher numbers, as if the engine rendered the sprites incrementally, from 127 to 0. In addition to this per-sprite priority, sprites can be associated with one background in 0..3. Similarly, a background with a smaller number will be on top of other backgrounds, and its associated sprites as well. Thus, as for priority, the sprites are first sorted by backgrounds, and in a given background they are sorted by their own priority. For example sprite #0 of background #0 will be always on top of all other sprites.
Each sprite behaves a bit like a big tile: it has an identifier and some overall informations such as flipping flags and palette-info for 16-color sprites. It is nevertheless made from several real tiles, which can be stored in memory according to two conventions: 1D mapping or 2D mapping. Specific tools can be used to turn any bitmap into a suitable tileset for DS sprites.
To follow TONC naming conventions, each sprite is either regular (standard, basic) or affine (being able to be rotated, scaled, sheared).
A regular sprite has several attributes that define its size, actual shape (depending both on the shape and size attributes), position (x,y of the top-left sprite corner in screen space), background priority (higher priorities are drawn first, hence are below lower-priority ones), flipping (horizontal and/or vertical), base tile, bit depth (palette range), activation (shown/hidden), alpha-blending status, mosaïc (blocky) effect status, windowing, and more.
The size of sprites can be 64x64 (the default), 64x32, 32x64.
Affine sprites are extended regular sprites. They have all regular attributes, and refer to additional affine-specific informations, the previously mentioned rotsets. Each affine sprite is transformable: it references an affine 2x2 transformation matrix, which defines how it should be rotated, scaled or sheared when being rendered. This matrix transforms points expressed in screen space into points in texture space, not the other way round.
Because of round-off errors due to fixed point matrix multiplications, one should avoid to compute multiple transforms in a row by reusing the previous affine matrix to compute the newer one: the error would soon grow too much. One should keep track of current transformation settings (angles, zoom factor, etc.) and recompute from them an affine matrix instead.
More information about these affine operations can be read from TONC, especially the affine sprite section about clipping, discretization and wrapping artefacts.
Sprites are discussed as well in Dovoto's tutorial and in this section of PAlib tutorial.
To perform animations, one should better have its sprites refer to different tiles, rather than considering that a sprite owns the tiles it uses, and therefore updating these tiles. Changing the tile index in the sprite attributes is quite fast and easy, but it requires that the various tiles for the animation frames can fit in the tile block. For example, even with the biggest banks (128 kilobytes), no more than 32 64x64 sprites, at 256 bit color, can be stored.
Another method would be to load dynamically the tiles for the animations, for example thanks to DMA copies, either directly to VRAM, or in a kind of back-buffer located in main RAM that can be swapped with the current sprite buffer when the animation needs its data.
More information on bitmaps, backgrounds and sprites, coming from the GBA but mostly relevant for the DS as well.
The system's 3D hardware can perform a lot of operations:
Character rendering might have a blocky appearance due to Point (nearest neighbor) texture filtering. 2D sub-pixel glyph rendering could be used though, as it is done with the TextViewer homebrew.
The DS can render at most about 6144 vertexes per frame (which translates to roughly 2048 triangles per scene or 1536 quads), at 60 frames per second. Rendering can occur only to a single screen at a time, so having 3D on both screens decreases performance significantly. The DS is more limited by its polygon budget than by its pixel fill rate.
There are 512 kilobytes of texture memory per screen, and the maximum texture size is 1024x1024 pixels.
The 3D core behaves a lot like an OpenGL state machine, allowing for wrappers and the reuse of rendering code and data. Actually OpenGL ES would be the closest encapsulation, as there is no support on the DS for floating point computations. Fixed-point is used instead.
See also the TONC section about basic linear algebra and its 3D section for theoritical elements about 3D rendering.
Sound tends to consume a lot of CPU and RAM resources, hence the best is often to target first the hardware-supported features.
Only the ARM7 can access the sound hardware, so we somehow have to have the ARM9 notify the ARM7 when it wants a sound to be played.
Sample data can be assigned independently to any of the 16 hardware channels. For a given channel, the playback frequency of the sample (ex: 22 050 Hz), the sample size (ex: 8bit) and the sample data length can be set, among other informations (channel enabled or not, looping mode or one shot, volume, etc.). Stereo sound can be output, with panning from left to right for example.
Sound output requires sound to play, see our data storage section explaining how to access the audio resources needed by your application.
Sample data also need to be passed to the hardware in raw format, i.e. as a series of uncompressed samples without any header. This is not the case of the most usual formats (wav, mp3, OggVorbis, etc.), therefore they have to be converted one way or another to the expected raw format (beforehand or by the program itself, at start-up or in-game). This can be done thanks to the sox tool, or thanks to the wav2gba tool. More information about the conversion can be found here.
Relying on the sound mixing hardware is the best bet: it can manage the 16 independent audio channels with about 5% memory bandwidth usage. Therefore using MOD-like soundtracks is favored, even by commercial games (moreover, according to some sources, using the official SDK implies being unable to program the ARM7, so they endure worse limitations than homebrew). Supported formats are 8 bit, 16 bit, or ADPCM. Any sound played through the DS sound hardware at a frequency other than 32768 Hz will be resampled to 32768 Hz with nearest-neighbor algorithm.
With advanced decoding like OggVorbis or MP3, one may eat around 50% of the ARM9 CPU power, or almost 100% of the ARM7, still with a pretty low bitrate. However with careful design and appopriate settings, as we will see for example with Helix-OSDL, one can have highly-compressed high quality music on the DS with quite a low resource consumption (CPU, RAM, storage-wise).
One could use the Tremor implementation to benefit from a FPU-less OggVorbis decoder (check then that memory leak issues have been solved), even if OggVorbis decoding on the ARM7 is not proven to be feasible, CPU-wise.
There is an alternate solution to OggVorbis, in order to use highly encoded music on the ARM7: use a mp3 decoder, which is expected to need generally less CPU resources than OggVorbis ones.
This may be done thanks to:
When using the ARM7 for that purpose, tight 32 bit (ARM, not Thumb) loops should be favoured. If games are generally interested in shifting the load to the ARM7, other applications, less CPU-bound, may just let the decoding take place on the ARM9.
When developping a game, after the audio content has been secured (i.e. obtained with an appropriate licence), in general it has to be transformed. On GNU/Linux, powerful sound editors are Sox (a command-line tool) and Audacity (a graphical tool). Quite often the audio files do not conform totally to their expected format and/or are somewhat corrupted, causing various post-processing tools or playback to fail. Audacity can be used to fix them, by first importing and then exporting them directly, as are.
After the audio content has been manipulated (cut, cleaned, and possibly run through various effects, including volume adjustment), it has to be converted, format-wise. Quality has often to be lessen, as the handheld resources are scarce.
When targeting an embedded MP3 decoder on the DS, lightening and conversion can be performed in a single step. For that we use the LAME encoder, whose reputation is quite good.
For example if you have a YourLongMusic.wav, with following format: RIFF (little-endian) data, WAVE audio, Microsoft PCM, 16 bit, stereo 44100 Hz (use the UNIX file command to figure it out), and if its size is about 145 megabytes (13'50 of high-quality music), you may use LAME to obtain a YourLongMusic.mp3 of only 8 megabytes or less, i.e. a compression ratio at least equal to 1800%.
To reach the previous ratio, a quite low (here constant) bitrate has to be used (80 kbps). The bitrate determines the bandwidth budget you chose, and in this budget you have to select which features are to be available. You can play mainly onto two variables: the number of output channels (ex: mono or stereo) and the output sampling frequency (ex: 22.05, 44.1 kHz, etc.).
Of course, for the same bandwidth budget, choosing stereo at 44.1 kHz will cause the encoding to loose a lot of audio details. So with a tiny budget of 80 kbps, to preserve the sound quality, one should probably prefer mono at 22.05 kHz. The following command can be used for such a conversion:
|
lame YourLongMusic.wav --verbose -m m -b 96 -q 0 --resample 22.05 YourLongMusic.mp3
|
Heard on a hifi player, the quality of the result, compared to the one of the original, is obviously lower. But it remains, in our opinion, well above the minimal expectations for a game background music that will be mixed with special effects and output by the DS, with either the plugged earphones or the internal speakers (which are neither bad nor good).
Low bitrates use less space on storage, are lighter for the memory buses and should require less overall CPU.
Another option, if your decoder supports it (it is the case of Helix-OSDL, thanks to Helix), is to use variable bitrate (VBR) instead of a constant one (CBR). Adapting dynamically the actual bitrate to match the instant needs of the sound leads to still better compression/quality ratio.
For example using VBR instead of CBR on the previous long music results in a file of about 3 megabytes, i.e. a deflating ratio of 4800%, with still a music that sounds quite good, even on a hifi system.
To do so with the lame encoder, one can use the following command (settings are mono, 22.05 kHz, intermediate quality [V=5], best algorithm [q=0], with a maximum bit rate set to 128 kpbs, no lame tag):
|
Note that --vbr-new can be replaced by --vbr-old to check whether the previous algorithm is better for your sounds. Some mp3 players (ex: xmms) may have trouble to compute the actual duration of a VBR-encoded sound. The sound is not truncated, its duration is just often underestimated.
Note also that clamping the maximum bitrate is useful, as it allows to reduce the upper bound of encoded mp3 frames. It results in fewer bytes having to be moved each time the decoder reaches the end of the frame buffer.
Often two kinds of audio content are discussed:
Sounds, being shorted hence smaller, are often either fully loaded or fully unloaded. Musics, on the contrary, will not fit entirely loaded in the DS 4 megabytes of RAM, be they heavily encoded (ex: mp3) or not.
The solution is therefore to stream them, i.e. to read them from file, chunk after chunk, in a well-sized buffer (usually a few kilobytes, see this discussion about the latency versus skip tradeoff; for music usually latency is not a problem). Each chunk should be available no later than when the samples it contains are to be played. Once read by the audio layer the chunk can be discarded and replaced by the next loaded one.
As often a chunk loading lasts a bit, it must be anticipated (the audio layer cannot wait for this loading to take place), either by using a ring buffer or by double-buffering audio.
As if it was not difficult enough, on the DS the samples are to be read on the ARM9 (libfat does not fit in ARM7 executable) but must be sent to the audio hardware by the ARM7 (the only one that can access it). Any decoding must therefore take place in-between, either sooner (on the ARM9) or later (on the ARM7). This requires a lot of synchronization between the two ARM. See our Helix-OSDL library for more details.
Once the amplifier has been powered on, the DS microphone is accessed through the Serial Peripheral Interface (SPI) on the ARM7, in a very similar way to the touchscreen is read. However helper libraries hide this inner working under higher level interfaces.
The built-in microphone can be used to perform some limited speech-recognition, as it is done in a few games.
This is the simplest method, it will work on any media, but it provides only limited space, as the whole ROM (including the data) will have to fit in the 4 megabytes of built-in RAM, and as the executables for each ARM must be under specific thresholds (64 kilobytes for the ARM7). Only read-only access to the data will be possible.
The data has to be converted to (binary) object files (*.o) thanks to objcopy (actually arm-eabi-objcopy) before being linked with the other object files in the the executable that will need them, thanks to the linker (actually arm-eabi-g++). With devkitARM makefiles, the inclusion of such object files is automated: if one creates a directory named data in the project folder (right next to source and include) and put in this data directory one's resource files renamed so that their final extension is .bin, then the Makefile will take them in charge automatically: it will apply arm-eabi-objcopy and create an appropriate associated header file, ready for inclusion.
Sounds would probably be embedded within the ARM7 executable, as this CPU is the only one able to access the sound hardware, in the unlikely case where the only 64 kilobytes permitted would be enough. Otherwise the data can be linked to the ARM9 executable. More information about the data embedding in executables can be found here.
Gameboy Advance cartridges (slot-2) have a 64 kilobytes place where data can be stored and retrieved, notably for game save. DS can use it, including in order to feed a program with data from the slot 2.
This area is called SRAM, but it should be understood as Save RAM, and not the usual Static RAM: it is non-volatile memory, its data will be kept even if the DS is switched off.
The GBA cartridge memory must be mapped to either the ARM7 or the ARM9 (then wait a few milliseconds before accessing it). Before writing to it, the cartridge ID should be checked to ensure there is a cartridge indeed and that the homebrew (maybe downloaded by Wifime) will not write over a commercial cartridge. It is done by reading 4 bytes from a given address in ROM space and by checking whether the four bytes form the string PASS.
All reads and writes to the SRAM must be 8 bits at a time (neither 16 nor 32-bit). These accesses can be performed anywhere in the SRAM memory space, and do not have to follow any specific rule. Therefore anything can be stored here: texts, images, sounds, etc. A good practise is to write at the beginning of this memory a small header that helps identifying the structure of the data being stored.
Some flash cartridges have more than one SRAM space, but apparently only one of them can be easily accessed.
More information about reading from SRAM can be found here.
Instead of decreasing the available RAM by adding data to executables, one may access selectively the slot-1 or slot-2 cartridges, as a filesystem, and retrieve only the chunks of chosen files taken from a directory tree.
With that method you can organize your data in as many files as you wish, and more important you are only limited by the size of the game cartridge, which is huge (up to 2 GB and more) compared to the other traditional storage locations in the DS. The main drawback is that it implies a cartridge must be used and your program must be stored on it. This method will not work for Wifi-downloadable applications (WMB).
The .nds ROM format and others offer space for a filesystem., and a buit-in filesystem too. The ndstool program can be used to add and remove files from it (use ndstool -? to display its help). Unfortunately there are no homebrew libraries available yet that allows reading this filesystem from the DS hardware.
Fortunately several other filesystems can be used, including the ancestor GBFS (Gameboy Advance Filesystem) and its successor, and now recommended, libfat, a library to manage (read/write/list) the FAT16 filesystem. It features better reentrancy support, cleaner source code, is built as a proper library and packaged as part of devkitPro.
The method to use most filesystems is quite simple: one gathers first, on a PC, all the files to be stored on the ROM filesystem, sorted according to the target directory structure.
Then a tool is used to create a single file that contains the filesystem (including these files). That file is then simply appended to the program binary. In some cases the program binary must be padded to a 256 byte boundary beforehand, thanks to the padbin tool, ex: padbin 256 MyProgramBinary.nds. Then the filesystem can be simply appended, ex: cat MyProgramBinary.nds MyFileSystem.fat > MyProgram.nds.
Finally the DS program have to use filesystem-specific code to manipulate its own ROM-embedded filesystem. It requires including the corresponding headers (ex: #include <fat.h>), initializing the filesystem support (ex: fatInitDefault()), and using the provided primitives to manipulate files (ex: fopen, fread, etc. like in POSIX systems) and directories (ex: diropen, dirnext, etc. here in a libfat-specific way).
Note that with libfat both slot-1 and slot-2 memory can be accessed, and simultaneously. More information about the recommended lifat can be found here.
More information about the mostly deprecated GBFS can be found here.
More information on embedded external data (written for GBA but applies to the DS as well).
Input handling can be done thanks to the traditional gamepad, but also thanks to the touchscreen (it can be used to offer a virtual keyboard, or with a mouse-like interface, or as an handwriting tool, etc.) and/or the microphone (speaking, blowing, shouting, etc.).
For all keys (or buttons) except X and Y, there is a read-only hardware register that can be read by either of the ARM to tell whether they are pressed or released. As for the X and Y keys, their state is available thanks to another register that can only be read from the ARM7.
For the ARM9 to have these last two keys, the ARM7 can read their state during the VBI and send them to the ARM9 thanks to the IPC structure. Two non-key informations can be transmitted that way too: the hinge state (DS lid open or closed) and the stylus state (down or up , i.e. whether it is on the touchpad or not).
Note that the key state is read 60 times per second. It implies that if a key was pressed and released fast enough (it would be quite difficult though), it would not be detected. Another method, more robust, is event-based: each keypress can be detected thanks to a specific interrupt. Then no key change can be lost.
On the contrary, most user keypresses last for more than a VBI period (16 ms). Such a keypress should not be interpreted as multiple keypresses though, even if multiple iterations of the main loop in a row saw that key pressed.
For example, if a key is used to pause/unpause a game, the user would press it once, but a too basic program would interpret it as a series of pause and unpause requests, whose length would be random, depending how many VBI were elapsed.
Actually, from the developer point of view, current key state is far less interesting than key transition: even if knowing that a key is pressed might be useful, knowing that this key just went from the released state to the pressed state (or the opposite) is still more useful. libnds reports that information thanks to the scanKeys, keysHeld, keysDown, etc. primitives.
PAlib offers abstractions to read easily the key states, hiding the VBI interrupt, the ARM7/ARM9 IPC communication and the different bit set conventions, and offering transitional reads.
The touchpad is made of a resistive coating whose conduction changes depending on the area of the contacting object. This change is measured from a temperature, and converted into numerical values by an Analog-to-digital converter, then translated to an onscreen location.
These measurements can also be used to determine the area of the contact point which, to some degree, can be translated into pressure. If the only information wanted is whether the stylus hits the touchscreen, one should use the scanKeys macro. This is only if the pen is down that the stylus position can be of interest.
The touchpad communicates to the DS only via a serial interface to the ARM7. For example thanks to libnds-provided default ARM7 binary, the measured screen coordinates can be read once per frame and made available to the ARM9 (see default ARM7 template and the touchReadXY function).
The built-in microphone can be used to perform some limited speech-recognition, or to detect the user blowing air, shouting at it, etc..
The DS keeps track of the date and of the time of day, to the second. Applications can react differently based on user time, duration since last use, etc.
The built-in Wifi support allows the DS to communicate (with a theoretical bandwith of 1-2 megabytes per second) with:
Most of these informations come from the listed hardware resources.
We saw in the rendering section that screen updates are in most cases hard-realtime synchronized, thanks to the VBI. For the overall game logic as well, a simple infinite while() loop in the main() function would not be very convenient, as either it would run at a random pace (depending on the amount of tasks to be performed on each iteration), or it would require to monitor the time interval between two iterations and to compute accordingly the behaviour of each simulated game actor. You then enter the realm of equation robustness against too high timesteps, etc.
These are real issues in the PC world where no two hardware platforms behave the same and where uncoupling all subtasks (audio/video rendering, AI, input reading, network management, etc.) becomes soon tricky, but in the console world the situation is somewhat simpler: everything ought to be hardwired and paced according to the same clock, here the 60 Hz rhythm provided by the VBI.
Instead of putting that logic code is the VBI handler, the best way is to keep the while() loop in the main() function, but to make each iteration end with a request for the DS to sleep until next interrupt occurs (with libnds, one would use swiWaitForVBlank()). Therefore both rendering and logic will run at a predictable 60 Hz, and thanks to the sleeps the DS will exhaust its batteries later.
The DS does not have a Memory Management Unit (MMU), a hardware component responsible for handling memory accesses requested by the CPU, notably to enable virtual memory management, memory protection, cache control, bus arbitration or bank switching.
It reduces the potential stability of operating systems (as Linux; if they are to be used on a DS), and prevents to access, as fallback swap, to mass storage that would be available in slot-2-provided removable media.
The DS contains both divide and square root accelerators.
The ARM7 processor supports both 32-bit and 16-bit instructions via respectively the ARM and Thumb instruction sets (the later is a subset of the former). 16-bit code is smaller than 32-bit one and, in some specific cases, faster (usually slower though). 16-bit code is often preferred, as it has more chances to fit in the tiny instruction caches. Moreover the size of ARM7 code must be in general 64 kilobytes or smaller.
The ARM9 is a full 32-bit CPU, but may be programmed in 16-bit too.
An important developing rule is to prefer using the CPU native words (16-bit datatype if the CPU is in 16-bit mode, 32-bit datatype if the CPU is in 32-bit mode) for most of your calculations, loop index, etc.: then the bus, the CPU registers and the instruction set will be "inline", as efficient as obtainable, whereas smaller datatypes would lead to runtime performance penalties. Unless they are packed in a structure, they will not be any smaller. Using such words only requires careful casting, because an ARM CPU is quite picky about memory alignment.
Various subsystems (power management, firmware, touchscreen, sound volume and control, microphone amplifier control and gain control, back-lighting of screens, power LED, battery status) can be accessed only thanks to the SPI (Serial Peripheral Interface) bus.
A DMA (Direct Memory Access) copy is basically a fast, CPU efficient, hardware accelerated copy: it allows certain hardware subsystems within the DS to access system memory for reading and/or writing independently of the CPU.
There are four prioritized DMA channels. They can transfer data asynchronously from the main CPU: the ARM9 initiates the transfer and, if it does not access to main memory, can continue its work while the DMA transfer is going on. Then it will receive an interrupt from the DMA controller once the operation has been done. It results in data transfer with much less CPU overhead.
For each DMA channel, the status (enabled/disabled), the start of transfer (immediately/at next HBL/at next VBL), the size of each atomic transfer (16/32 bits), the trigger of an interrupt when the transfer is over, the source and destination transfer pattern (fixed/ascending/descending) can be chosen. All these informations are set thanks to a register (DMA_CR in libnds) that tells too whether a given DMA channel is busy (dmaBusy in libnds).
Note though that during a DMA transfer the CPU is locked off the bus, thus restraining a lot what it can done in the mean time. Note also that the DMA circuits are not aware of the ARM9 caches, leading to potential inconsistencies.
More information on DMA can be found in this TONC section.
A timer is a hardware function that can be set to raise an interrupt at regular intervals, once enabled. There are eight incrementing 16bit timers, four for each CPU.
Timers are useful to wait for a given duration, or to schedule an action regularly. There are four timers in the DS, each running at up to 33.514 MHz. This frequency can be scaled down of various powers of two, and timers can cascade: then for example timer #1 would increase only on timer #0 overflow. If needed, a timer may trigger an interrupt when it overflows.
Timers can be managed thanks to two registers, named in libnds TIMER_CR(x) and TIMER_DATA(x) with x in 0..3.
More information on timers can be found in this TONC section.
Quite a few languages can use sources directly read from the DS. Currently these are mostly interpreted (no native compiler available): there are ports for Python, Perl or Lua, maybe one day Erlang. Some of them are expected to be run from DSLinux.
One of course could use ARM assembly code to develop, but for most needs it would be useless overkill, as the development duration would explode for no real gain. Even with higher level languages though, some knowledge of bit operations and other low level operations is required.
As for C/C++, one needs a full build toolchain, since these languages are compiled instead of being interpreted. No native toolchain is available directly from the DS: it would demand more RAM than the built-in 4 megabytes (hence specific flash carts would be required), compilation would be long, and the development process would be quite inconvenient.
Therefore application development starts usually on a computer rather than on the DS: the built binaries are cross-compiled, i.e. they are generated on a PC but according to the conventions of another architecture (here, the DS), so that they can be executed finally on this target architecture. This is quite common in embedded environments.
Once the programs are compiled (from the C/C++ sources to a set of object files) and linked (thanks to DS-specific linkscripts telling, depending on the ARM, which and how memory regions should be used at runtime, see ds_arm7.ld and ds_arm9.ld in devkitPro/devkitARM/arm-eabi/lib), they can be tested in place, i.e. on the PC, thanks to DS emulators, or they can be transferred to the DS and run on it.
We consider here that you have the basic tools installed on your computer, notably a text editor (vi, emacs, nedit, etc.) or an IDE
(for Integrated Development Environment, ex: KDevelop, VisualHAM or Visual C++ 2005 Express, etc), and the GNU make program. The associated makefiles, which specify how the different targets for an application should be built (which steps, which tools, which options, etc.), are essential, as way too many commands are involved in the repetitive development process to type them directly when needed. Other generic tools should be used as well, for source control (CVS, SVN), for documentation generation (doxygen), etc.
Most of the tools that will be mentioned here (i.e. devkitARM, libnds, libfat, dswifi, PAlib, DeSmuME, NO$GBA), plus dlditool, can be installed by hand or thanks the LOANI script, provided by OSDL for GNU/Linux users. One just has to download latest LOANI archive, extract it and run:
|
--nds switch).
See Dovoto's tutorial and Dave Murphy's guide (maintainer of devkitARM) for more information about the installation of tools.
Note that the devkitARM tools are designed to run on 32-bit architectures. If your PC uses a 64-bit processor you will need the ia32-libs for Debian-based distributions.
We will now list all the major software that might be involved in homebrew development.
We need the common build tools to generate binaries from our C/C++ sources: a preprocessor, a (ARM) compiler and a linker (not related to the cartridges, here it designates a software tool) that knows the DS ROM formats and its memory layout.
Tools for commercial developers are not available for homebrewers but, luckily, there is an alternative toolchain, whose name is devkitpro. This toolchain is adapted from the GCC (GNU Compiler Collection) one. Its supports many consoles besides the DS (GameBoy Advance, GP32, Playstation Portable and GameCube). DS are ARM-based, hence we need to choose devkitARM, which provides everything we need (and more).
Installing devkitARM on UNIX is straightforward: one just has to download latest stable version and extract it. Nothing more needs to be done, as the toolchain is prebuilt here: you download directly the appropriate binaries, and there is not real point in recreating them from their sources.
To use the standard functions devkitARM offers (ex: abs, atoi, free, getenv, rand, etc.), one should specify in its source files #include <stdlib.h>.
With devkitARM you will be able to write programs with all the classical C/C++ core constructs. But what about text output ? Graphics ? Touchpad or key input ? The C/C++ language and runtime do not really provide these features natively.
You could thus perform all these operations by yourself, from the lowest level. You would then have to figure out for example that, at address 0x4000000, there is a 32-bit register that you can write to, in order to control the display. Even if most of the relevant technical information is available, your time and patience might be quite quickly exhausted. Thus you can use a low level library instead, that would spare you these very significant efforts. This is the task of libnds, discussed below.
Note that dynamic libraries are not supported on the DS. Therefore each executable has to be statically linked with the libraries it uses. It is not a real drawback on such a platform where OS multitasking (see DSLinux) is not widely used. The size of your executables should not explode anormally due to the (static) linking to multi-purpose libraries, since only object files defining symbols effectively referred to will be kept. The inclusion is per object file and not per symbol, so as soon as a symbol is used, all the other symbols defined together in its objet file will be added too, even if they are not used.
Libnds, formerly named ndslib, supports nearly all features of the Nintendo DS, including: touchscreen, microphone, 2D/3D hardware, and 802.11b Wi-Fi via the dswifi library (detailed below). See also the libnds API. Its license is very permissive, see it in include/nds.h.
It is not the purpose of libnds to give you advanced components that would do all the work for you. It is just a thin layer that will abstract a bit hardware facilities, thanks to suitable low-level primitives which will hide unwanted technical details, such as the actual location of registers in memory.
libnds is thin enough not to really imply tradeoffs: compared to ad hoc (direct) lowest level programming, using it should not hinder anything or result in a loss of performance.
Hence if you are not making a full use of libnds, most of the time it is that you chose to rely on higher level libraries.
The installation of libnds is trivial (just a matter of extracting the latest archive). If you plan to use PAlib (discussed later), libnds will be provided with it, no need for a specific libnds install then (although the PAlib-included version is often quite outdated).
To make use of libnds, one just has to include the libnds header (#include <nds.h> with the appropriate command-line switch -IPath/To/Libnds/Headers) to compile against the library. To link to it the -LPath/To/Libnds/Library -lnds switches have to be added, at the end of the link line (libnds does not depend on any other system-specific library, but higher level ones, such as PAlib, use libnds).
A convenient way of browsing the latest libnds sources is to make use of their web CVS. One can read also the libnds examples to learn how to use the library. They are not installed by LOANI currently.
Apart from the numerical constants (ex: addresses of registers), libnds defines several useful primitives (functions, defined in header files stored in libnds/include/nds) discussed here. Links that are given refer to the cutting-edge CVS version of libnds source files.
Here are listed most of the services offered by libnds:
Even if libfat is probably a better alternative, libnds provides support for GBFS (Gameboy Advance Filesystem). GBFS is a portable uncompressed archive format, a read-only filesystem. Released with the GPL license, it is similar in principle to GNU 'tar' but is much simpler in structure, has an order of magnitude less overhead per stored object (32 bytes vs. 500 bytes), and can be searched in O(log n) time, rather than O(n) time.
A GBFS archive can be seen as a flat ordered list of GBFS files, each of which referring to any number of GBFS objects (entries), which are sequences of bytes. GBFS entries are sorted according to their name, which allows for a quick bsearch-based binary search.
Related code in libnds seems to be the same as in GBFS. It is declared in include/gbfs.h and defined in source/common/gbfs.c. In libnds examples, see filesystem/embedded_gbfs/source/main.c.
Thanks to the structures GBFS_FILE (referring to the GBFS overall filesystem of interest) and GBFS_ENTRY (an actual file in a GBFS_FILE), operations such as file look-up (gbfs_search_range / find_first_gbfs_file/skip_gbfs_file), opening (gbfs_get_obj / gbfs_get_nth_obj), copy (gbfs_copy_obj) and file count (gbfs_count_objs) are available.
Most relevant information about GBFS usage can be found in readme.txt, extracted from the GBFS archive. There is also an helpful tutorial, in French.
Declared in include/nds/bios.h, defined in source/common/biosCalls.s, these libnds functions branch directly to the ones defined in the DS BIOS. Though being defined in BIOS does not imply being hardware-accelerated, they should be rather optimized though, and they allow programs (including the firmware) to be smaller.
These functions deal notably with:
swiDivide / swiRemainder / swiDivMod, swiSqrt, swiGetSineTableswiDelay (unit for the RTC access), swiIntrWait / swiWaitForIRQ / swiWaitForVBlankswiSoftReset, swiSetHaltCR, swiHalt, swiSwitchToGBAModeswiCopy, swiFastCopy (see our data transfer section)swiCRC16swiIsDebuggerswiUnpackBits, for structures defined at the bit levelswiDecompressLZSSWram / swiDecompressLZSSVram, for the Lempel-Ziv-Storer-Szymanski algorithmswiDecompressHuffman, for the Huffman codingswiDecompressRLEWram / swiDecompressRLEVram, for the simplistic Run-length encodingswiDecodeDelta8 / swiDecodeDelta16 , probaby linked to Delta encodingswiGetPitchTable, swiGetVolumeTable, swiChangeSoundBiasThese operations are declared in include/nds/card.h and defined in source/common/card.c. An example is available in card/eeprom/source/main.cpp.
cardReadHeader (reads the 512-byte header), cardReadIDcardPolledTransfer (blocking), cardStartTransfer (non-blocking), cardWriteAndReadcardReadEeprom, cardWriteEeprom, cardEepromReadID, cardEepromGetType, cardEepromGetSize, cardEepromChipErase, cardEepromSectorErase
All DMA functions are declared inline, and thus defined in the same header file: include/nds/dma.h.
dmaCopyWords, dmaCopyHalfWords, dmaCopy) or asynchronous (dmaCopyWordsAsynch, dmaCopyHalfWordsAsynch, dmaCopyAsynch). dmaCopy and dmaCopyAsynch use the third DMA channel, other let the developer select the channeldmaFillWords, dmaFillHalfWords (both synchronous)dmaBusyInterrupt functions are declared in include/nds/interrupts.h, defined in source/common/interrupts.c and in source/common/interruptDispatcher.s.
irqInitirqEnable, irqDisableirqSet, irqClearirqInitHandlerIPC are mainly here defines, structures and inline functions defined in include/nds/ipc.h.
TransferRegion structure defined, getIPC and FIFO alsoIPC_SendSync, IPC_GetSyncTransferSound structure defined for sound metadata transfertime and time structures definedRelated (ARM7) code is to be found notably in include/nds/arm7/touch.h and /source/arm7/touch.c
TSC_MEASURE_TEMP1, TSC_MEASURE_X, etc.touchReadXY, touchRead, touchReadTemperature are available, whereas for the ARM9 another touchReadXY is declared (in include/nds/arm9/input.h) and defined (in source/arm9/touch.c). It reads the result from its ARM7 counterpart thanks to IPCKey management is mostly declared in include/nds/arm9/input.h, and defined in source/arm9/keys.c. Keys have be read at the lowest level thanks to both ARMs, but are usually managed with the ARM9 to update directly the application state. Thus libnds focuses on the ARM9 for its exported functions.
KEYPAD_BITS, KEY_A, etc.scanKeys (update key states), keysHeld, keysDown, keysDownRepeat, keysUpkeysSetRepeat to set the key repeat parametersREG_KEYINPUT, REG_KEYCNT) are defined in include/nds/system.h
The DS Motion Card/DS Motion Pak can be managed thanks to a large number of functions (motion_init, motion_read_x, motion_read_gyro, motion_acceleration_x, etc.). They are declared in include/nds/arm9/ndsmotion.h and defined in source/arm9/ndsmotion.c
Time is mostly taken care of by the ARM7. Most time primitives are declared in include/nds/arm7/clock.h, and defined in source/arm7/clock.c. See also the structure for RTC defined for IPC.
rtcReset, rtcTransaction (helper), rtcGetTime / rtcSetTime, rtcGetTimeAndDate / rtcSetTimeAndDate, rtcGetDatainitClockIRQRendering, both 2D and 3D, is controlled directly by the ARM9, which drives the specialized rendering cores.
As for generic (non-2D/non-3D) video defines, see include/nds/system.h for lcdSwap, lcdMainOnTop, lcdMainOnBottom and various LCD status registers (ex: DISP_VBLANK_IRQ). The SetYtrigger function defined here too.
RGB15, VRAM_A_CR, VRAM_A_MAIN_SPRITE, MODE_5_2D) are set in include/nds/arm9/video.hvramSetMainBanks, vramRestoreMainBanks, vramSetBankA, etc.) are also declared in include/nds/arm9/video.h, and declared in source/arm9/video.cBG_COLOR_256, TEXTBG_SIZE_256x256, etc.) are set in include/nds/arm9/background.hRGB_24 structure and the image structure are declared in include/nds/arm9/image.h and defined in source/arm9/image.cloadPCX, declared in include/nds/arm9/pcx.h, defined in source/arm9/pcx.cimage24to16, image8to16, image8to16trans, imageDestroy, and imageTileData (remaps a normal image into a tiled one) functions, declared also in include/nds/arm9/image.h and defined in source/arm9/image.cATTR0_ROTSCALE, ATTR2_PALETTE, enumerations (ex: tObjMode, tObjShape, tObjSize, etc.), structures and unions (ex: SpriteEntry, SpriteRotation, tOAM) are defined in include/nds/arm9/sprite.hlibnds provides a 3D API somewhat similar to a subset of OpenGL.
GLvector), enumerations (ex: GL_MATRIX_MODE_ENUM), etc. are defined in include/nds/arm9/videoGL.h. Contains as well the FIFO command defines aimed at the 3D core (ex: FIFO_DIFFUSE_AMBIENT, FIFO_VIEWPORT) and the GL-like functions (ex: glTexImage2D, gluTexLoadPal, glBindTexture)BoxTest / BoxTestf), or, better, asynchronously (BoxTest_Asynch / BoxTestf_Asynch). Results can be obtained for asynchronous calls thanks to BoxTestResult. Declared in include/nds/arm9/boxtest.h, defined in source/arm9/boxtest.cPosTest), or, better, asynchronously (PosTest_Asynch / PosTestBusy). Various pieces of information can be obtained, thanks to PosTestWresult function (camera distance), and to the PosTestXresult, PosTestYresult and PosTestZresult functions. Declared and defined in include/nds/arm9/postest.hGFX_VERTEX_XY, GFX_FOG_TABLE, MATRIX_LOAD4x4) are set in include/nds/arm9/video.hAudio is to be managed by the ARM7. Audio can be driven from the ARM9 though. libnds audio primitives are mostly declared in include/nds/arm7/audio.h, and defined in the rather empty source/arm7/audio.c. See also the audio BIOS support.
SOUND_VOL, SCHANNEL_CR, etc.MIC_ReadData, StartRecording, StopRecording, ProcessMicrophoneTimerIRQ, PM_SetAmp (gain control), MIC_On MIC_Off. See source/arm7/microphone.cplaySound, setGenericSound, playGenericSound functions are declared in include/nds/arm9/sound.h and defined in source/arm9/sound.cDefines are declared in include/nds/timers.h. Timers are triggered by a 33.514 MHz source on the ARM9, and probably also for the ARM7.
TIMER_FREQ, TIMER_FREQ_64, etc.TIMER_DATA, TIMER0_CR, TIMER_IRQ_REQ, TIMER_DIV_1
etc.The console support is declared in include/nds/arm9/console.h and defined in source/arm9/console.c. Cursor and escape sequences are supported.
consoleInit, consoleInitDefault and consoleDemoInit functions allow to use default settings or to set specifically the font, the address location where it will be loaded, its palette and bit depth, the console map, and to specify the number of glyphs defined in the font and the ASCII code of its first character. Default font is stored in source/arm9/default_font.binconsoleCleariprintf (defined in devkitARM's stdio.h)Here are various useful constructs defined in various places in the source:
GBAHeader, NDSHeader)sysSetCartOwner, sysSetCardOwner, sysSetBusOwnersLOADNDSpowerON, powerSET, powerOFF and power defines for each subsystem. See also, for the ARM7, power management defines (ex: PM_SOUND_AMP),
writePowerManagement and readPowerManagement in include/nds/arm7/serial.hPERSONAL_DATA structures are defined and the readUserSettings function is declared. It is implemented in source/arm7/userSettings.c__argv structure (not very useful yet)BCDToInteger and integerToBCD, declared in include/nds/arm7/clock.h. For various fixed-point conversions, see include/nds/arm9/videoGL.hreadFirmware and firmware commands (ex: FIRMWARE_WREN) in include/nds/arm7/serial.hREG_SPIDATA, SPI_BAUD_4MHZ) and associated function (SerialWaitBusy) are in include/nds/arm7/serial.h. The implementation is in source/arm7/spi.c
SQRT_CR), scalar fixed-point and integer operations (ex: divf32, div32) and 3D vectors operators (ex: crossf32, dotf32, normalizef32) are defined in include/nds/arm9/math.h. Most of them are hardware-accelerated. See also the maths support in the BIOS section, and the access to precomputed trigonometric values provided by include/nds/arm9/trig_lut.h. It refers to cosinus (source/arm9/COS.bin), sinus (source/arm9/SIN.bin) and tangent (source/arm9/TAN.bin)isRumbleInserted and setRumble, declared in include/nds/arm9/rumble.h and defined in source/arm9/rumble.centerException, setExceptionHandler, defaultExceptionHandler and getCPSR functions, a stack of exception vectors is available. It is declared in include/nds/arm9/exceptions.h and defined in exceptions.c. An exception handler is defined in source/arm9/exceptionHandler.sIC_InvalidateAll, IC_InvalidateRange)) and the data cache (DC_FlushAll, DC_FlushRange, DC_InvalidateAll, DC_InvalidateRange) can be flushed and invalidated (partially or as a whole), so that they stay in synch with the main RAM, for example for DMA transfers. Declared in include/nds/arm9/cache.h and defined in source/arm9/icache.s and in source/arm9/dcache.s
Most applications and games need some way of reading and writing from and to non-volatile media, and to access it as a filesystem rather than, say, a sequence of data blocks. This is useful notably to read resource files (images, sounds, etc.) and to write highscores, settings and saved games.
The good news is that the cards already offer an underlying filesystem (usually FAT-based, but might be ext2 or anything else), and that the homebrew applications can usually make use of it.
In the case of the DS, among the many filesystems that could be used, one of them, FAT16, is by far the most common. To manage such filesystems, a dedicated library, libfat, can be used. It depends on libnds, both of which being packaged as part of DevkitARM. libfat library and sources can also be downloaded directly from here.
With libfat files can be managed almost exactly as they would be on POSIX systems. Directories follow different conventions. See also our section about the use of filesystems for the DS.
Note that libfat allows only to read directly the filesystems in the first partition of slot-1 and slot-2 cards: it does not allow to read a FAT filesystem embedded in a ROM, i.e. directly stored in the application executable (except when using fcsr-appended FAT images on slot-2).
Using embedded filesystems can be convenient, so that the application is entirely self-contained (as commercial games for example) and the user does not have to and cannot mess with the various application files. To use a filesystem embedded in a ROM itself stored in a FAT filesystem, one may use libefs.
Note also that in its current form, libfat cannot be used by default nor efficiently with the ARM7: the library is too large to fit in its at most 96 kB of fast RAM. To use libfat nevertheless with the ARM7, the linker script should be modified so that the ARM7 executable is stored in main memory. But this RAM is quite slower than the IWRAM.
With libfat on the SuperCard Lite, the X.ds.gba cannot be run at all, the X.sc.nds will freeze when fatInit is called. Only the X.nds can run correctly.
libefs allows to manage a ROM-appended NitroFS-based file system, on slot-1 or slot-2 cards. It is, to a certain extent, a homebrew counterpart offering a libfat-aware variation to the official (Nintendo proprietary) NitroFS filesystem.
Explained differently: with libefs you can append a file hierarchy to your ROM and acccess it quite simply, from your homebrew, thanks to libefs functions. That ROM is expected to be placed in a FAT-based slot-1 or slot-2 card filesystem. As a matter of fact, the ROM-embedded filesystem storing your content is NitroFS.
libefs has to know the target card filesystem (most generally FAT, in that case libefs depends on libfat) to locate first the ROM, so that it can find in it its embedded filesystem: most of the problem comes from the fact that a running homebrew program does not know the name of the ROM file that it was loaded from (argv[] cannot be set, at least is not set currently).
Once libefs is initialized, reading files and listing directories in that embedded filesystem is supported. Writing to files can be performed (self-modifying ROM), provided that a file with the target name already exists and was created with a sufficient size (space must be already allocated). Thus filenames must be planned, and sizes too: at ROM generation, just create a file with random content (or, better, all zero) of the right size, and modify its content at runtime. For example,
|
MyFutureContentFile.dat will be a 1000-byte file whose content could be change at runtime, once included in the ROM embedded filesystem.
Multiple files can be opened at the same time by libefs.
After a series of writes, make sure you call EFS_Flush, to ensure data is actually written.
Creation and appending of the filesystem is performed directly by ndstool: libefs plays mostly a role afterwards, at runtime. Therefore one has to ensure that the ARM executable (ARM7 and/or ARM9) that will access to the embedded filesystem is indeed linked with libefs.
All the files and directories to be put in the ROM filesystem should be copied in a root dedicated directory (ex: MyFutureNitroFS) in your project directory, on your PC, with the desired organization (file hierarchy). Then, when creating your .nds ROM with ndstool, you have to specify of course your ARM7 and ARM9 executables, but also here your content directory, as "data files", i.e. with the -d option. For example:
|
The resulting .nds should be patched thanks to efs.exe before being distributed (this allows to prepare some space in the ROM header for the cached location of the libefs-enabled ROM in the card, to look up afterwards the appended filesystem).
As usual, the end user may need to DLDI-patch its ROM so that it can work on his target slot-1 or slot-2 device.
The build process is a bit different if using a slot-2 device that does not have a libfat support or if targeting an emulator: the ROM should not include at first your appended data (hence ndstool is only given the two ARM executables), but you should create a FAT image (ex: MyFATImage.img) containing your data files (i.e. the content of the previously mentioned MyFutureNitroFS directory).
Once your .ds.gba ROM padded to a 512-byte boundary (devkitPro/devkitARM/bin/padbin 512 MyGame.ds.gba), just append your FAT image (ex: cat MyGame.ds.gba MyFATImage.img > MyGameWithFS.nds). Finally one just to apply the fcsr DLDI patch to enjoy its ROM. Apparently it uses the quite widely supported gba_nds_fat system to read the FAT image. See these posts for more information.
In all cases, if the ROM (say, the .nds file), ends up, because of the libefs-embedded filesystem, with a size that exceeds 4 MB, the loader will load the ARM7 and ARM9 executables to RAM, and ignore the trailing data, which will remain usable though.
See libefs main article and this other thread for more details.
dswifi (see also here) offers a low level interface to the DS Wifi connectivity. Access points, connexions, IP adresses, frames and packets can be easily handled thanks to that library. This allows to use the standard (IEEE 802.11) Wifi connectivity, currently no homebrew library allows to communicate using the proprietary (Nintendo-specific) Nifi protocol.
PAlib (alternate site on Sourceforge) is one of the highest level abstracting libraries. It is built on top of libnds and offers various higher-level integrated services to the homebrewer.
Like HAM for the GameBoy Advance, its intended public is developers wanting to use the most time-effective methods to write their software. Hardware purists often consider any library beyond libnds being useless (bloating software), restrictive or performance-killer. One should try both ways to make one's opinion.
As for me, I found interesting to use first libnds only, to learn how things work. Once done, anything allowing to gain some time sounds interesting to me, and I would not like to reinvent the wheel too often. So I use PAlib quite frequently, often after studying the sources to understand how each of its primitives is implemented.
The PAlib library encapsulates hardware-related operations into higher level C structures and functions, whose suffix is PA_. One should read the official tutorial first, before consulting the full API documentation. There are many useful examples in the PAlibExamples package, and in the following sections: Quick Demos, Platform Game (first version, second one) and Carré Rouge.
Some of the most common services (not all) offered by PAlib will be discussed here.
u16)PA_InitText specified which background is to be used for a given screen, text rendering on that screen will use implicitly that backgroundPA_General.h ; Implementation: armX/PA.c]. The X in armX signifies either 7 or 9, as both define it
PA_Init(): initializes the library. Must be used at the beginning or main(). [Header: PA_General.h; Implementation: armX/PA.c]
PA_InitRand, and PA_Rand, PA_RandMax, PA_RandMinMax: they allow respectively to seed for the real-time clock the random number generator (to avoid obtaining always the same random sequences), and to generate random values between specified bounds [Header and Implementation: arm9/PA_Math.h]PA_GetAngle, PA_Sin and PA_Cos: fast trigonometric-related functions, explained herePA_RTC: to read time and datePA_UserInfo: to read user informations (name, birthday, language, message, alarm)PA_SetScreenLight: to set the screen backlightingTEXT1, TEXT2 and TEXT3: see the root makefilehardware windows can be managed, see this API. [Header and Implementation: PA_Window.h]See also the API documentation for general functions.
PA_InitVBL(): prepares the use of the VBL to synchronize operations, by setting VBL PAlib handler and enabling the VBL [Header and Implementation: arm9/PA_Interrupt.h - arm7/PA.c]PA_WaitForVBL(): puts the DS in sleep mode, waiting to be awoken by the VBL interrupt. It powers off some subsystems (starting from the ARMs), which saves battery charge. Lid might be checked here [Header and Implementation: arm9/PA_General.h]PA_SetAutoCheckLid, PA_CheckLid, PA_LidClosed: lid can be automatically checked at each VBL. Should it be closed, the DS will shutdown automatically until the lid is opened again, as most commercial games do [Header and Implementation: arm9/PA_General.h]See also the API documentation for interrupts.
There is a 10-color preset palette for text rendering: white (0), red (1), green (2), blue (3), magenta (4), cyan (5), yellow (6), lightgray (7), darkgray (8), black (9).
Text can be cleared by printing at the same location a string containing as many spaces as there were characters in the previously rendered string.
Most text primitives are tile-based. If it allows them to be simple and fast (since they are hardware-accelerated), they are fixed-width and have to fit in 8x8 tiles. So software-rendered fonts have been added, see for example PA_SmartText.
These are plotted in framebuffer mode, and allows for fonts of different sizes and, in a given font, for characters themselves of different sizes (variable width). PAlib offers by default five different font sizes, numbered 0 to 4, starting from characters 4 or 5 pixels wide and tall (probably too small to be readable without efforts) to far bigger fonts.
Last choice with these framebuffer-based fonts is the color depth they use. They can be either in 16 colors only, for better speed and lower memory footprint (see PA_16cText). Or they may have a 8-bit color depth, to benefit from 256 colors and from the possibility of being rotated by the hardware of +Pi/2 or -Pi/2, so that the DS can be held in portrait mode rather than in landscape mode (see PA_SmartText).
Variable character spacing leads to better looking and more compact text renderings, at the expense of: speed (such software rendering is a lot slower), simplicity of use (for example with these fonts the background has to be cleared first), and absence of direct printf-like formatting (which would be still slower, though it can done separatly if needed, with sprintf for example).
void PA_InitText(u8 screenNumber, u8 backgroundNumber): initializes the Palib module dedicated to text rendering, including a preset 10-color palette. It loads the appropriate font data in VRAM and selects the specified screen and backgrounds. That same background will be used for all next text renderings to this screen. Works only in modes 0, 1 and 2. [Header: arm9/PA_Text.h; Implementation: arm9/PA/PA_Text.c]void PA_SetTextTileCol(u8 screenNumber, u8 color): sets the specified color (0 to 9) from preset palette as current text color for next renderings. [Header: arm9/PA_Text.h; Implementation: arm9/PA/PA_Text.c]PA_SetTextCol(u8 screenNumber, u16 r, u16 g, u16 b): sets the specified RGB color as current text color for all text renderings (next and already rendered ones). Each color component should be in 0..31. [Header: arm9/PA_Text.h; Implementation: arm9/PA/PA_Text.c]void PA_SetTileLetter(u8 screenNumber, u16 tileAbscissa, u16 tileOrdinate, char letter): renders the specified letter in specified screen to specified location. [Header and Implementation (macro): arm9/PA_Text.h]u16 PA_OutputSimpleText(u8 screenNumber, u16 tileAbscissa, u16 tileOrdinate, const char * text): renders the specified C-string (null terminated) in specified screen to specified location, after having removed any previous text that would be already in the target location. Returns the number of letters rendered. [Header: arm9/PA_Text.h; Implementation: arm9/PA/PA_Text.c]void PA_OutputText(u8 screenNumber, u16 tileAbscissa, u16 tileOrdinate, const char * text, ...): renders the specified C-string, respecting a specified printf-like format, in specified screen, after having removed any previous text that would be in the target location. Manages the extra variable-length parameters a bit like printf: %s to output another string, %d to output a value, %fX to output a float with X digits, \n to go to the next line, %cX to choose one of the 0..9 colors from the preset palette. Here's the API example:
|
PA_OutputSimpleText, but quite slower. [Header: arm9/PA_Text.h; Implementation: arm9/PA/PA_Text.c]u32 PA_BoxText(u8 screenNumber, u16 basex, u16 basey, u16 maxx, u16 maxy, const char *text, s32 limit): renders the specified C-string so that it fits in the specified box (whose upper-left corner is (basex, basey), lower-right corner being (maxx,maxy)), using word-wrapping. No more than limit characters will be rendered. [Header: arm9/PA_Text.h; Implementation: arm9/PA/PA_TextSpecial.c]u32 PA_BoxTextNoWrap(u8 screenNumber, u16 basex, u16 basey, u16 maxx, u16 maxy, const char *text, u32 limit): renders the specified C-string so that it fits in the specified box (whose upper-left corner is (basex, basey), lower-right corner being (maxx,maxy)), even by cutting words (no word-wrapping). No more than limit characters will be rendered. [Header: arm9/PA_Text.h; Implementation: arm9/PA/PA_TextSpecial.c]void PA_ClearTextBg(u8 screenNumber): clears all text tile entries in the map, resets the print states [Header: arm9/PA_Text.h; Implementation: arm9/PA/PA_Text.c]void PA_InitCustomTextEx(u8 screenNumber, u8 bg_select, void *tiles, text): initializes the font module with specified custom font, made thanks to PAGfx. text is a symbol name corresponding to the filename of the font image converted with PAGfx. [Header and Implementation (macro): arm9/PA_Text.h]void PA_ShowFont(u8 screenNumber): displays the full font being used currently. Useful for debugging purposes [Header and Implementation (macro): arm9/PA/PA_Text.c]s16 PA_SmartText(u8 screenNumber, s16 basex, s16 basey, s16 maxx, s16 maxy, char* text, u8 color, u8 size, u8 transp, s32 limit): renders the specified C-string so that it fits in the specified box (whose upper-left corner is (basex, basey), lower-right corner being (maxx,maxy)), using word-wrapping and a variable-width font on an 8 bit background (see PA_Init8bitBg). color is the color index in the palette (0..255). size is the font size and ranges from 0 (really small) to 4 (pretty big). No more than limit characters will be rendered. transp will clear the text location before rendering if equal to zero, will render on top of previous content if one, will not render anything but count the letters if two, will rotate of Pi/4 the text if three, of -Pi/4 if four. [Header: arm9/PA_Text.h; Implementation: arm9/PA/PA_Text.c]s16 PA_CenterSmartText(u8 screenNumber, s16 basex, s16 basey, s16 maxx, s16 maxy, char* text, u8 color, u8 size, u8 transp): renders the specified C-string so that it fits centered in the specified box (whose upper-left corner is (basex, basey), lower-right corner being (maxx,maxy)), using word-wrapping and a variable-width font on an 8 bit background (see PA_Init8bitBg). color is the color index in the palette (0..255). size is the font size and ranges from 0 (really small) to 4 (pretty big). No more than limit characters will be rendered. transp will clear the text location before rendering if equal to zero, will render on top of previous content it if one, will not render anything but count the letters if two, will rotate of Pi/4 the text if three, of -Pi/4 if four. [Header: arm9/PA_Text.h; Implementation: arm9/PA/PA_Text.c]void PA_8bitCustomFont(bit8_slot, bit8_fontName): adds a custom font to the 8-bit font system. The specified font must have been converted with PAGfx. The 0-4 font slots are set by PAlib (but may be reset if needed), whereas the 5-9 slots are left free for the user. [Header and Implementation (macro): arm9/PA_Text.h]void PA_InitTextBorders(u8 screenNumber, u8 x1, u8 y1, u8 x2, u8 y2): defines a text box with borders, so that primitives for box font rendering can be used in it. Up to one such box can be used. [Header: arm9/PA_Text.h; Implementation: arm9/PA/PA_TextSpecial.c]void PA_EraseTextBox(u8 screenNumber): erases the text in the text box defined thanks to PA_InitTextBorders. [Header: arm9/PA_Text.h; Implementation: arm9/PA/PA_TextSpecial.c]u32 PA_SimpleBoxText(u8 screen, const char *text, u32 limit): renders the specified C-string so that it fits in the previously initiliazed textbox, using word-wrapping. No more than limit characters will be rendered. Same as PA_BoxText, but using text borders already defined. [Header: arm9/PA_Text.h; Implementation: arm9/PA/PA_Text.c]void PA_ClearTextBg(u8 screenNumber): clears all text tile entries in the map, resets the print states [Header: arm9/PA_Text.h; Implementation: arm9/PA/PA_Text.c]
Text output primitives taking an argument for string size (text length) are useful to perform per-character progressive typing, by incrementing this size at each VBL for example. One has to ensure with boxed text that the string is not too long: its size must not be higher than (maxx - basex)*(maxy - basey).
Colored texts can be rendered per letter (see the %cX format switch with primitives like PA_OutputText) or per-string (see PA_SetTextTileCol). In all cases the color definition of a palette index can be redefined, see PA_SetTextCol.
Other functions include PA_CompareText (to compare two strings), PA_CopyText (to copy one string into another), PA_Print (to print text without specifying a location), PA_PrintLetter (same thing for one letter instead of a text). There are some special effects for font rendering, defined in PA_OutputTextSpecialX, with X in 0..5.
One may use PAFont to create custom fonts, see this section of PAlib tutorial. Another more recent tool is dsFont.
A PAlib text tutorial can be found here, and the associated API for text output is here.
Button states can be read from the Pad structure. Here K will be the name of a key, in {Left, Right,Up,Down,A,B,Select,Start,X,Y,L,R}. For each key, both the current state (in Pad.Held.K) and the transitional state (in Pad.Released.K and Pad.Newpress.K) will be automatically updated (as boolean values) during the VBL (once per frame), to know respectively if this key is currently pressed, if it just went from pressed to released, or from released to pressed. Transitions last just for one frame.
For further informations, refer to PAlib pad tutorial and to the Key input system section of the API. Main header is arm9/PA_Keys.h, main implementation is arm9/PA/PA_Keys.c.
The stylus is managed in a very similar way to the keys: it is updated once per frame, and in Stylus.Held, Stylus.Released and Stylus.Newpress one can know whether it is up or down, and if it is just after a transition or if it has been already so for a while.
For further informations, refer to PAlib stylus tutorial and to the Key input system section of the API. Main header is arm9/PA_Keys.h, main implementation is arm9/PA/PA_Keys.c.
This is in my opinion one of the most interesting features of Palib. This module displays a keyboard bitmap on the touchscreen and allows the stylus to select keys, so that text can be input in a rather convenient way.
After having been set-up in a free background thanks to PA_InitKeyboard, the keyboard can be smoothly scrolled to a given position when created with PA_KeyboardIn: it slides in from the bottom, and can slide out with PA_KeyboardOut. Its two colors can be changed thanks to PA_SetKeyboardColor (as for the background color, one should use PA_SetBgPalCol. PA_CheckKeyboard allows finally to read the characters being hit: any non-null return code designates directly the newly read key.
The keyboard pictures (two of them are necessary, to show the available characters depending on the shift key being selected on not) are located in lib/arm9/PA/keyboard.bmp, which allows for skinnable keyboards (see also the PA_InitCustomKeyboard macro).
For further informations, refer to PAlib pad tutorial and to the Keyboard section of the API.
This is another quite amazing feature: powerful and really easy to use. Priceless for games needing to draw specific shapes (ex: runes) or as an alternative to the virtual keyboard.
Shape recognition can be used either to input PA Graffiti (standard shapes that map to letters) or custom-made patterns.
For PA Graffiti input, one just has to call each frame PA_CheckLetter, and everything will behave like in the case of PA_CheckKeyboard, when the virtual keyboard was used.
For recognition of custom-made shapes, one just has to first disable the PA Graffiti input (thanks to PA_UsePAGraffiti(0)), then to associate shapes to letters before reading recognized symbols thanks to PA_CheckLetter once again. Quite impossible to be simpler.
But how can such a custom-shape be described ? Just draw it yourself on the touchscreen, and make it be read by the system with PA_RecoShape. It will return an encoded string describing the shape you drew. You then just have to store it in your program, and register it thanks to PA_RecoAddShape so that the module will be able to recognize this shape afterwards.
In the PA_RecoInfo structure, which is updated when the stylus is just released, some other informations are stored: the total length in pixels of the drawing, the starting and ending points, and a bounding box of the drawing, the smallest upright rectangle that encloses the shape.
I found this feature really impressive indeed.
For further informations on shape recognition, refer to the dedicated section in PAlib tutorial and to the Shape Recognition section of the API.
Sprite palettes can be loaded thanks to PA_LoadSpritePal, then sprites using them can be created with PA_CreateSprite, which sets the number of the sprite, thus its priority in its background. Once done they can be moved, either thanks to the stylus with PA_MoveSprite (touching the sprite will link its center to the stylus and make it follow its movements until released, see also PA_SpriteTouched), or, more frequently, with the very simple PA_SetSpriteXY (or PA_SetSpriteX, or PA_SetSpriteY).
One just has not to forget they set the upper-left corner of the sprite, whereas often it is moved center-wise, and that coordinates are wrapped around. Reciprocally sprite positions can be read, thanks to PA_GetSpriteX and PA_GetSpriteY.
As opposed to the previous per-sprite priority in a given background (default one is background #0), a sprite can be associated with the background having another (lower) priority thanks to PA_SetSpritePrio.
Sprites can be as well rotated and scaled (both from their center point), when associated to one of the 32 rotsets. (0..31). PA_SetSpriteRotEnable allows to associate a sprite to a rotset, knowing that multiple sprites can share the same rotset, if they are to be rotated and scaled the same way.
Then rotsets can be modified, with regard to scale, zoom and both by, respectively, PA_SetRotsetNoZoom, PA_SetRotsetNoAngle and PA_SetRotset. The specified angles are in 0..511, counter-clockwise. The zoom factors can be 256 (normal size), 512 (half size), 128 (double size), and can be set independently for abscissa and ordinates. Finally a sprite can be detached from its rotset thanks to PA_SetSpriteRotDisable.
When rotated and/or scaled up, the sprite might exceed the rectangular size declared at its creation (ex: 32x32). In this case it will be clipped (exceeding parts will be cut), unless PA_SetSpriteDblsize is used to double the dimensions of its clipping rectangle (hence quadrupling the clipping area). One must then take into accound the fact that it will offset the sprite position, as the sprite is always located relatively to the upper left corner of its clipping box.
Sprites can be flipped horizontally (PA_SetSpriteHflip) and/or vertically (PA_SetSpriteVflip). The mosaïc effect can be used on them, thanks to PA_SetSpriteMosaic first, then PA_SetSpriteMosaicXY (the specified mosaïc settings will be common to all sprites having the mosaïc effect enabled). The same stands for transparency (alpha-blending, whose level ranges from 0 for transparent to 15 for the default, solid): all sprites having it enabled (thanks to PA_SetSpriteMode), once the option is activated on the backgrounds (with PA_EnableSpecialFx), share the same transparency level (set by PA_SetSFXAlpha)
Frames are basically animation steps for a given sprite. All such frames should be put on a tall unique image, each being on top of the other after the conversion (as a consequence all the frames have to share the same palette). The sprite itself would be created as if it was made of only one image, then PA_SetSpriteAnim would be used to select one of the sprite frames, which will be the sprite current bitmap. Note that selecting a new frame triggers the copy of this frame to tile memory, an operation that takes some resources and may slow down an application should too many frames be replaced.
Thus frames allow to choose directly, for each sprite, which of its multiple images will to be displayed. But it is still up to the developer to manage the overall animation, with regard to frame selection and timing.
Animations push one step further the process: they automate the frame management. The developer just has to specify the starting frame, the ending frame, the pace (animation speed, expressed in frames per second) to
PA_StartSpriteAnim. Then at this function return, the animation will start and perform an infinite looping, until either PA_StopSpriteAnim or PA_PauseSpriteAnim is called, respectively to stop or pause the animation.
To spare some memory, symetrical frames can be included only in one version, using the hardware-accelerated PA_SetSpriteHflip and PA_SetSpriteVflip to flip them horizontally and/or vertically just before their animation step comes.
Lastly, one may choose, thanks to the two extra options offered by PA_StartSpriteAnimEx, the animation type, i.e. whether the frames are displayed in a basic loop (ANIM_LOOP, frame #1 to #n, then #1 to #n, etc.), in a back and forth way (ANIM_UPDOWN, frame #1 to #n, then #n to #1, then #1 to #n, etc.) or just once (ANIM_ONESHOT). The number of cycles can be chosen with the second extra option, with -1 for infinite cycling, and a positive number to set the number of cycles to that value. Note that with ANIM_UPDOWN, going back and forth uses two cycles.
This features allows to manage both screens as if they formed a single double-sized one: ordinates ranges from 0 to 383 (starting from the top-left pixel of the top screen), instead of 0 to 191 (twice).
This can be obtained by using the Dual prefix (ex: PA_DualCreateSprite, PA_DualSetSpriteXY, PA_DualSetSpriteRotEnable, etc.). In this case no screen parameter is to be specified, as there is only one logical screen.
The hinge space between the two screens can be abstracted (as if it did not exist, the two screen being directly one on top of the other) or, on the contrary, managed as if it were a hidden part of the overall logical screen. For the first case PA_SetScreenSpace would be called with a zero parameter, whereas on the second case the default value, 48 pixels, could be kept, or extended to 64 pixels.
One thing is to be able to move sprites around, another one is to detect when they collide. PAlib provides two ways of detecting collisions: circular or rectangular bounding boxes, explained here. If neither of them is pixel-perfect, they are most of the time quite sufficient.
Circular detection is obtained thanks to PA_Distance, to compare the (square) distance between the centers of the (circle) bounding-boxes to the (square of the) sum of their radius.
Rectangular detection is obtained thanks to up to four comparisons, without need of a specific function.
Most tile-based games should implement a collision map, a 2D array of boolean values that tells if at a given tile location [p,q] the corresponding tile is walkable for example.
For further informations on collision with PAlib, refer to the dedicated section in its tutorial.
PAlib makes use mainly of 256-color tiled backgrounds (up to four of them, named bg0..bg3; tiled background #0, i.e bg0, will be drawn on top of #1, etc.), with their traditional tile maps and tilesets. 8-bit or 16-bit framebuffer backgrounds are less used (using respectively 3/8 and 3/4 of a 128-kilobytes VRAM bank, up to one per screen), and rotation backgrounds (either regular or ERB, up to two per screen) are even less used.
Tiled backgrounds can be loaded directly thanks to PA_EasyBgLoad or PA_LoadTiledBg (including their palette), if they have been produced by PAGfx (see this section of PAlib tutorial). Otherwise PA_LoadSimpleBg and PA_LoadBgPal should be used, for example with data (maps, palettes, tiles) produced by gfx2gba. With both tools, .h and .c files can be produced and included in the executable, which is one of the ways to embed resources (the simplest, though with limitations).
As PAGfx makes an optimized use of tiles, their index may vary, and one should better read them from the map directly, if possible. Once a tile index is known, any map position can be set to the corresponding tile thanks to PA_SetMapTileEx.
Classical scrollings can be achieved thanks to PA_BGScrollXY or PA_EasyBgScrollXY, both of which specifies the position the background should scroll to (both have counterparts to scroll only horizontally or vertically, ex: PA_BGScrollX). Backgrounds are wrapped around, but on 256 pixel boundaries: if your background is, say, 256+X pixel wide, there will be a 256-X blank space until the 512 pixel boundary allows it to wrap.
PAlib introduced special tiled backgrounds named LargeMap, which can exceed the 512x512 tile size offered by the hardware. To do so, during the scrolling, PAlib loads dynamically next tiles. Such backgrounds should be loaded with PA_LoadPAGfxLargeBg, and scrolled with PA_LargeScrollXY (not too slow, but does not wrap around) or with PA_InfLargeScrollXY (wraps around, but is quite slow).
Parallax scrollings (where different backgrounds scroll at different speeds, the closest the fastest to create a 3D/depth effect) are implemented as well: use for example PA_InitParallaxY to initialize a vertical parallax scrolling and then PA_ParallaxScrollY to perform the actual scrolling. LargeMap backgrounds can be parallax scrolled too.
They take a lot of memory, their rendering is slow, but: they allow to display pictures in common formats (with PAlib: 16-bit .jpeg, 8/16-bit .gif, 16-bit .bmp, 8/16-bit .raw are supported) without prior conversion, and/or to easily draw shapes with the stylus, and 16-bit framebufferst got rid of the palette (as many colors as pixels, thanks to direct colors).
Images for framebuffers must be 256×192 to avoid their being distorted. PAGfx should be used for them. For 8-bit framebuffers, use PA_Init8bitBg to setup the background mode, PA_LoadNormalBgPal to load the palette and PA_Load8bitBitmap to load the bitmap itself. For 16-bit framebuffers, no palette is needed, thus use just PA_Init16bitBg to setup the background mode and PA_Load16bitBitmap to load the bitmap itself.
Images can be included from header files (automatically produced from images found in the data directory) and displayed with, for example, PA_LoadGif and PA_LoadGifXY.
After PA_SetVideoMode is used to set an appropriate video mode (up to two rotating backgrounds can be used at once, they can be wrap-around or not), these backgrounds (and their palettes) must be loaded with PA_LoadPAGfxRotBg (if produced by PAGfx), before being rotated (around any given point) and/or scaled and/or moved with PA_SetBgRot.
For further informations on backgrounds with PAlib, refer to the dedicated section in its tutorial and to the following sections of the API: Normal Tiled Background Modes, Rotating Backgrounds and Background Modes on two Screens.
Even if there is a pseudo-3D video mode (the Mode 7, that can be used for example to implement interesting special effects), there is a real 3D subsystem on the DS, that can be used with PAlib.
No need any more to define USE_3D in PA_Config.h. One just has to use PA_Init3D to initialize the 3D subsystem on the bottom screen (use PA_SwitchScreens to target the top screen). Then PA_Init3DDrawing should be used to define where the camera is and in which direction it is looking at.
To see something, at least one object is to be created in an adequate location. First the current transform matrix should be saved thanks to glPushMatrix, then the object should be defined (ex: with PA_3DBox), then the saved trasnform matrix should be restored (glPopMatrix) before requesting the rendering to take place (glFlush).
PAlib's current 3D layer uses floating-point coordinates, which is somewhat a performance-killer. OpenGL ES version for platforms with no hardware floating-point support (FPU-less, hence using fixed-point) could be use instead. Some tricks couls allow to have 3D on both screens "simultaneously", but it would be rather limited.
More information can be found in the 3D section of the PAlib tutorial and in the related section in the API documentation.
First the original movie has to be converted from the .avi to various .vid files and a header. Then a template should be used to include the movie in a GBFS filesystem before playing it with PA_LoadMultiVidGBFS, after having initialized GBFS ( PA_InitGBFS) and the adequate video mode (either PA_Init16bitBg(1, 3) or PA_Init16bitBg(0, 3)).
More information about movie playback can be found in the Video section of the PAlib tutorial.
There are two kinds of PAlib sound output: raw output and MOD playback, which are rather complementary. Both need the sound system to be initialized, thanks to a call to PA_InitSound. There are 16 hardware channels that can playback simultaneously, by default 8 of which are reserved by PAlib for raw output, the remaining 8 being used by the MOD player.
Raw output is like reading a .wav file: easy and perfect for special effects, but not adequate for musics due to the very significant size of these longer sounds. When having a sound to be output on the DS, it must be converted first. An appropriate target format could be mono 8-bit signed samples at 11025 Hz (but stereo sound and higher sample rate are supported). To play that sound on the DS, once the sound subsystem is initialized, use simply PA_PlaySimpleSound. One of the 8 (0..7) hardware channels reserved by PAlib should be then specified.
On the contrary, MOD is perfect for music playback, since musics are encoded in very small sizes. Once the sound system is initialized, one just has to use PA_PlayMod to play a MOD file, that should not have more than 8 channels.
PAlib includes a filesystem named PAFS (PAlib File System), although the older GBFS filesystem could be used too (PAlib provides a GBFS wrapper for backward compatibility). PAFS allows to read files from the ROM, or directly from the RAM (embedded filesystem in the executable), which allows to use it with WMB and emulators as well. Running from RAM implies a maximum total size for the executable of 4 megabytes, and to specify the RAM size you want to reserve for the user filesystem.
libfat is quite an interesting alternative to the less commonly used PAFS. PAlib offers a few helper functions to be with with libfat (see arm9/PA_IO.h and arm9/PA/PA_IO.c).
First the PAFS image must be created with PAFS.exe, by appending files to the archive. Then various primitives allow to initialize the filesystem module on the DS (either from slot-2 thanks to PA_FSInit or from RAM thanks to PA_FSRamInit) and to read/write files and directories. For ROM, see the PA_PAFSFile and PA_FSSys array structures. For RAM, see PA_FSRam (to define the allocated size in RAM for the filesystem) and PAFSStart to read the RAM instead of the ROM.
More information can be found in the PAFS section of the PAlib tutorial.
PAlibwifi is used for this. The corresponding header file () and library (libdswifi9r.a, i.e. LIBSPA:= -lpa9 -ldswifi9r) should be specified.
Initialization of the library should be done thanks to PA_InitWifi, and connection with PA_ConnectWifiWFC, before a socket connected to a remote host can be created with PA_InitSocket. Then data can be sent and received, thanks to send and recv. PA_GetHTTP allows to retrieve a file thanks to the HTTP protocol. The IP address of the DS, as seen by the outside (Internet), can use PA_GetHTTP to call a server returning the IP of the client.
More information can be found in the Data Transfer and Multiplayer section of the PAlib tutorial.
At compile time, PAlib overall headers must be included: #include <PA9.h> for the ARM9, with the -IPath/To/PAlib/include/nds command-line switch. A PAlib general header will in turn include all the specialized headers, like PA_Interrupt.h.
At link time, the PAlib (static) library must be specified. As it depends on libnds, following switches should be used: -LPath/To/PAlib/lib -lpa9 -LPath/To/Libnds/lib -lnds for the ARM9.
To install PAlib, follow PAlib's tutorial or use LOANI.
There are still many other libraries, but they are less used. SDL has been ported to the DS. This abstraction layer is very useful to port (often PC) applications to lesser known platforms such as the homebrew-enabled DS, but in our case a few issues remains: the DS SDL implementation is not complete, it uses a lot of memory with regard to what is available, and a lot of hardware acceleration would be bypassed because of the layer. SDL may be here a way of starting a port, even though finally the game ought not to rely on it, for performance reasons.
Now has come the time for a first test, here directly with PAlib. LOANI users should first source the LOANI-installations/OSDL-environment.sh file to update their environment:
|
Then let's build some tests: go for example in devkitPro/PAlibExamples/Input/Keyboard/Keyboard and just execute make. It will read the Makefile and generate, from the sources (in source/main.c), the corresponding ROM: Keyboard.ds.gba, Keyboard.nds and
Keyboard.sc.nds (all occupying around 95 ko). Refer to our section about ROM formats for a reminder of their respective role.
Something similar to this should occur:
|
> make
main.c arm-eabi-g++ -g -mThumb-interwork -mno-fpu -LYourLOANIDir/LOANI-0.5/LOANI-installations/devkitPro/PAlib/lib -specs=ds_arm9.specs main.o -LYourLOANIDir/LOANI-0.5/LOANI-installations/devkitPro/PAlib/lib -lpa9 -LYourLOANIDir/LOANI-0.5/LOANI-installations/devkitPro/libnds/lib -lfat -lnds9 -ldswifi9 -o build.elf Nintendo DS rom tool 1.33 - Jan 27 2007 16:00:04 by Rafael Vuijk, Dave Murphy, Alexei Karpenko built ... Keyboard.ds.gba dsbuild 1.21 - Jan 28 2007 using default loader |
To decrypt a bit, the Makefile will try to rebuild target $(OUTPUT).ds.gba, whose name is deduced from the current directory (here, Keyboard). To build Keyboard.ds.gba, Keyboard.nds is needed, which in turns implies Keyboard.bin exists, then Keyboard.elf, then $(OFILES). This variable contains all the object files needed, deduced from the source code (*.c, *.cpp) but also from the resources to be embedded (ex: *.jpg, *.bmp, etc.).
Thus the first thing is to obtain these object files. The C++ compiler for ARM (arm-eabi-g++) is called to generate an object file for the ARM9, main.o, from main.c. Have a look at this file, this is the main one you are expected to write on the future.
Once all the object files are created, they can be aggregated by the linker (here, arm-eabi-g++ again) in Keyboard.elf (ELF for External Link Format).
More precisely main.o, that provides the main() function, will be linked (statically; no dynamic linking available on the DS) with PAlib (-lpa9 refers to libpa9.a, 9 for the ARM9), which itself uses some helper libraries: libfat, libnds9, dswfi9, even if this simple example does not use them all. Linking with unused libraries will not make your ROM bigger: they will not be included if really not referred to.
Keyboard.elf can then be converted in Keyboard.bin by arm-eabi-objcopy, whose role is to copy and translate object files from a given binary format to another, here stripping extra informations not needed and not handled by the toolchain.
From Keyboard.bin, Keyboard.nds (at last, a ROM file !) will be generated thanks to devkitARM/bin/ndstool, whose role is to combine the two ARM executables and the data resources into a single file ready for DS distribution. Note that Keyboard.bin contains everything but the executable for the ARM7. This one is retrieved here from a precompiled default version, a kind of template, located in arm7.bin.
Finally the devkitARM/bin/dsbuild executable is used to generate Keyboard.ds.gba from Keyboard.nds. This involves adding a slot-2 loader.
See also our more in-depth build example.
You have two options here: either the ROM must come one way or another to the DS (transfer), or the DS must come to the ROM and the PC (emulation).
The most obvious method is to transfer your ROM, here Keyboard.sc.nds (renamed for the Supercard, from Keyboard.ds.gba), to your DS: copy it to, say, your microSD card, insert that card in your DS and run the ROM, for example thanks to the SuperCard menu. That should work.
This method has however two drawbacks. The minor one is that on some computers, notably laptops like mine, Linux support for SD card is still quite limited, and often you end up with mounting, reading or writing problems. The major drawback is, even if the SD are well recognized, it becomes soon tiedous to swap the card again and again between its adapter on PC and the DS. For most people, the developing process requires too frequent tests to do so.
Using a Wifi transfer, preferably thanks to a router, could do the trick, and be more convenient than the card swap. One could use DSLinux for a SSH or FTP transfer followed by a reboot. This is not necessarily the best solution ever though. As for cable (parallel, USB, etc.), as already discussed, they either require soldering efforts, or are quite expensive and require still some user action (to plug/unplug the cable seems to be required).
The second method for testing your programs is to use an emulator. This will allow a PC to mimic your DS, so that you can test in-place the (approximated) result of your ROM.
Though the imitation is not always perfect (sadly, programs may work when emulated, but not on the actual DS device; the other way round is possible of course), emulators have progressed a lot. For the Linux user, in decreasing order of interest, one should use:
NO$GBA, probably the best emulator around, with a very complete and accurate 2D support, a fast improving 3D support, able to run many commercial games. On Linux it should be used with Wine (apt-get install wine for Debian-based distributions). Just use LOANI, or download it, unzip it, run wine NO\$GBA.EXE and select your .ds.gba file (ex: Keyboard.ds.gba)

The colors might seem different from the expected ones due to a kind of DS screen emulation filter. This can be deactivated in Options -> Emulation Setup -> GBA Mode (or press F11) by selecting VGA (poppy bright).
NO$GBA can provide a source level debugger as well, for professionals (this advanced tool is not free of charge).
DeSmuME: probably the fastest of all emulators. Does not support zooming and rotation. There is a Linux version and even Debian packages, based on a SDL port. Some people prefer to run the Windows version from Wine. It is one of the few emulators to allow for the reconfiguration of key mappings
To do so, use LOANI or download DeSmuME latest stable version, unzip it, and simply run wine NDeSmuME.exe. In the File menu, you can select Open and Execute, and choose, this time, your .nds file (ex: Keyboard.nds). You should then be able to test it immediately:

See also the NDSEmulator.com site.
Debugging thanks to any emulator a ROM using a libfat-based filesystem (either directly or through libefs) is possible by creating a FAT12 image file from your content directory, appending that image to your padded ds.gba ROM, and finally applying the fcsr DLDI-patch on it. See this thread for more information.
Thanks to this guide and the listed tutorials, you should be more than ready to write your own DS application. Often starting simple and building up works well. Thanks to forums and IRC channels, you should have kind support if needed.
|
This explanation is based first on a PAlib example (an executable using PAlib is built), then on examples taken from libnds (the build of the library itself, and the one of a program using it).
The Make versions have been modified to remove the '@' characters at the beginning of actual make target commands, so that their output can be seen on a terminal.
Some output have been shorten (indicated by [..]), and LOCAL and PREFIX shell variables have been substituted for better readability.
The PAlib example discussed here is taken from PAlibExamples/Sprites/Movement/MoveSpritewithStylus. The vast majority of PAlib Makefiles are exactly the same.
The Makefile is taken into account from the build subdirectory:
|
First the dependancies of main.o are determined with devkitARM gcc (-MM option), and requested to be stored them in the build/main.d file thanks to the following command-line:
|
arm-eabi-gcc -MM -g -Wformat=2 -Winline -Wall -O2 -I${LOCAL}/include -I${LOCAL}/build -I${LOCAL}/data -I${PREFIX}/libnds/include -I${PREFIX}/libnds/include/nds -I${PREFIX}/PAlib/include/nds -I${LOCAL}/build -DARM9 -I${PREFIX}/PAlib/include/nds -o main.d ${LOCAL}/source/main.c
|
-g: adds debugging information-Wformat=2: checks calls to printf and scanf, strftime, etc.-Winline: warns if a function can not be inlined whereas it was declared as inline-Wall: enables most general warnings-O2: attempts to improve the performance and/or code size
The result in build/main.d is:
|
main.o: target is modified, this main.o should be rebuilt.
Once these dependencies have been computed in main.d, main.o is to be compiled. This gcc, adapted for DS cross-compilation, transforms main.c into main.o, an ELF 32-bit LSB relocatable object file, ARM, version 1 (SYSV), not stripped. Same command-line than previous one, except there is no -MM switch and the main.o target is specified:
|
arm-eabi-gcc -g -Wformat=2 -Winline -Wall -O2 -I${LOCAL}/include -I${LOCAL}/build -I${LOCAL}/data -I${PREFIX}/libnds/include -I${PREFIX}/libnds/include/nds -I${PREFIX}/PAlib/include/nds -I${LOCAL}/build -DARM9 -I${PREFIX}/PAlib/include/nds -c ${LOCAL}/source/main.c -o main.o
|
Then main.o is linked to the libraries it refers to, which results in the generation of build.elf, an ELF 32-bit LSB executable, ARM, version 1 (SYSV), statically linked, not stripped:
|
arm-eabi-g++ -g -mthumb-interwork -mno-fpu -L${PREFIX}/PAlib/lib -specs=ds_arm9.specs main.o -L${PREFIX}/PAlib/lib -lpa9 -L${PREFIX}/libnds/lib -lfat -lnds9 -ldswifi9 -o build.elf
|
-mthumb-interwork requires that a given program can use both the ARM and Thumb instruction sets. See GCC ARM options for more details. -mno-fpu should mean that no floating-point unit is available, although this does not seem to be the proper switch to be used here. -specs specifies the DS link script that shall be used (to take into account the DS memory layout and al), and the various libraries are listed in order, from the most specific to the least (PAlib, libfat, libnds, dswifi). All these settings are to be used only for the ARM9.
The result is an executable in the ELF format, which has to be transformed into a format directly suitable for the DS thanks to arm-eabi-objcopy:
|
Finally the target .nds file can be obtained from the ARM9 executable just built (build.bin) and from the template ARM7 executable (prebuilt arm7.bin) with some additional metadata (logo, sentences, etc.):
|
ndstool -c ${LOCAL}/MoveSpritewithStylus.nds -9 build.bin -7 ${PREFIX}/PAlib/lib/arm7/arm7.bin -o ${LOCAL}/build/../logo_wifi.bmp -b ${LOCAL}/build/../logo.bmp "PAlib Project;using PAlib;www.palib.info"
|
|
|
When creating the actual library, code for both ARM is to be compiled.
Here is an example of compilation:
|
arm-eabi-gcc -MMD -MP -MF ${PREFIX}/libnds-sources/deps/arm7/clock.d -g -Wall -O2 -fomit-frame-pointer -ffast-math -I${PREFIX}/libnds-sources/include -mthumb -mthumb-interwork -mcpu=arm7tdmi -mtune=arm7tdmi -DARM7 -I${DEVKITPRO}/libnds-sources/build/arm7 -c ${DEVKITPRO}/libnds-sources/source/arm7/clock.c -o clock.o
|
here is a link example for library creation:
|
arm-eabi-ar -rc ${DEVKITPRO}/libnds-sources/lib/libnds7.a audio.o clock.o microphone.o spi.o touch.o card.o gbfs.o interrupts.o biosCalls.o interruptDispatcher.o
|
and here an example where an executable is (statically) linked against a library:
|
arm-eabi-gcc -specs=ds_arm7.specs -g -mthumb -mthumb-interwork -Wl,-Map,basic.map defaultARM7.o -L${DEVKITPRO}/libnds-sources/lib -lnds7 -o ${DEVKITPRO}/libnds-sources/basic.elf
|
The map-related settings tell which object files of the static libraries must be embedded in the executable, due to which symbols being used by this executable. These .map files are generated by the linker, thanks to a -Map myMap.map option. Here this option has to be passed by the compiler to the linker, so the -Wl, switch is added.
For the ARM9, here is an example of compilation:
|
arm-eabi-gcc -MMD -MP -MF ${DEVKITPRO}/libnds-sources/deps/arm9/boxtest.d -g -Wall -O2 -fomit-frame-pointer -ffast-math -I${DEVKITPRO}/libnds-sources/include -mthumb -mthumb-interwork -march=armv5te -mtune=arm946e-s -DARM9 -I${DEVKITPRO}/libnds-sources/build/arm9 -c ${DEVKITPRO}/libnds-sources/source/arm9/boxtest.c -o boxtest.o
console.c
|
here is a link example for library creation:
|
arm-eabi-ar -rc ${DEVKITPRO}/libnds-sources/lib/libnds9.a COS.o default_font.o SIN.o TAN.o boxtest.o console.o exceptions.o gurumeditation.o image.o keys.o ndsmotion.o pcx.o rumble.o sound.o system.o touch.o video.o videoGL.o card.o gbfs.o interrupts.o dcache.o exceptionHandler.o icache.o biosCalls.o interruptDispatcher.o
|
and here an example where an executable is (statically) linked against a library:
|
arm-eabi-gcc -specs=ds_arm9.specs -g -mthumb -mthumb-interwork -Wl,-Map,TouchTest.map balldata.bin.o ballpalette.bin.o main.o -L${DEVKITPRO}/libnds/lib -lnds9 -o ${DEVKITPRO}/libnds-examples/input/TouchTest/TouchTest.elf
|
For compilation, following switches are recommended:
-g -Winline -Wall -O0 -mthumb -mthumb-interwork -mcpu=arm7tdmi -mtune=arm7tdmi -DARM7 -DDEBUG -Winline -Wall -O3 -fomit-frame-pointer -ffast-math -mthumb -mthumb-interwork -mcpu=arm7tdmi -mtune=arm7tdmi -DARM7-g -Winline -Wall -O0 -mthumb -mthumb-interwork -march=armv5te -mtune=arm946e-s -DARM9 -DDEBUG -Winline -Wall -O3 -fomit-frame-pointer -ffast-math -mthumb -mthumb-interwork -march=armv5te -mtune=arm946e-s -DARM9-mcpu=arm9tdmi -mtune=arm9tdmi are used, but they should be not favoured, as less accurate.
-fno-rtti -fno-exceptions.
To create a library X from a set of object files (generated as explained previously), use arm-eabi-ar -rc libXp.a a.o b.o c.o [...], with p being 7 or 9 for the ARM7 or the ARM9 (recommended convention).
To link an executable against a library X (generated as explained previously), use:
|
arm-eabi-gcc -specs=ds_arm9.specs -g -mthumb -mthumb-interwork -Wl,-Map,MyExecMap.map a.o b.o [..] -L${DEVKITPRO}/libnds/lib -lnds9 -o MyExec.elf
|
When designing a GUI, for example for a game, one often draws quickly some sketches to figure out various organizations, with pen and paper. To help that process, we designed a quick and dirty DS-Lite representation suitable for printing (two DS per sheet):

If you have information more detailed or more recent than those presented in this document, if you noticed errors, neglects or points insufficiently discussed, drop us a line!