Our goal here is to describe a way of managing graphical rendering on the Nintendo DS that may be relevant for some types of games, notably a lightweight isometric engine suitable for RPG-like games.
This consists on:
We based most of the technical choices on our guide to homebrew development for the Nintendo DS.
Heavy preprocessing of images is to be performed before being able to render them efficiently from the DS, notably for sprites. So we had to gather a dedicated transformation toolchain for graphics. The various generic tools we tried would have implied too many limitations. We thus developped our own tools, which rely directly on our OSDL library: beyond being used for realtime game engines, it proved to be very helpful to develop tools as well.
We are discussing here only about the graphical rendering of the underlying game world, which is to be managed by the OSDL generic game engine. Audio content in general is not discussed here, see Helix-OSDL instead.
The game will use a lot of 2D assets, including many animated sprites from various sources, including converted versions from Reiner's Tilesets.
Even if most sprites will be scaled down and some animation frames may be removed due to space constraint, one of the main challenges will be to keep a lower enough memory footprint so that the graphical content fits in the scarce memory resources of the DS.
This will involve using fully all the VRAM banks of the DS, but also using a double-layered level of cache, as these banks will not suffice: first level of cache will be the DS main RAM, second one the DS cartridge.
We plan to have one screen (the top one) of the DS dedicated to the in-world rendering (top-down isometric view), whereas the bottom one will display the game user interface (stats, input device as mouse-like pointer or virtual keyboard, textual descriptions, close-up views, etc.).
In-world rendering being the most intensive task, the main 2D core will be devoted to it (so it will be associated to the top screen). Thus the user interface will rely on the sub core, on the bottom screen. No 3D rendering is planned.
Based on the bank abilities, the in-game bank layout we chose is:
| Bank name | Bank size (in Kilobytes) | Bank owner | Intended role |
|---|---|---|---|
| VRAM_A | 128 | Main engine | Sprite Graphics |
| VRAM_B | 128 | Main engine | Sprite Graphics |
| VRAM_C | 128 | Sub engine | Background |
| VRAM_D | 128 | Main engine | Background |
| VRAM_E | 64 | Main engine | Sprite Graphics |
| VRAM_F | 16 | Main engine | Sprite Graphics |
| VRAM_G | 16 | Main engine | Sprite Graphics |
| VRAM_H | 32 | Sub engine | Background |
| VRAM_I | 16 | Main engine | Extended palettes |
Main reasons for that is that we want to dedicate as much as possible memory for the main core, notably to hold as much sprites as possible. Bank C is the only one of the four main banks to be able to hold the sub background, D cannot contain main sprite graphics, etc. The sub engine does not need any sprite.
The game scenes will be made of a static background for environment (grounds, stairs, walls, non-interactive elements, i.e. non-breakable non-movable) on top of which several layers of elements will exist (characters, monsters, furnitures, doors, carpets, objects, etc.).
Static backgrounds will be stored in background memory, whereas all other elements will be sprites.
These tile-based (not framebuffer-based) static elements are not expected here to be scaled, shared or rotated, unless for some special effects. Thus text backgrounds will be mostly used. We prefer relying on the 8-bit color mode (256 colors), as rendering might be a bit poor with 4-bit color mode (16 colors).
There is no direct-color mode for sprites: a palette has to be used.
Among the available sprite color schemes, the mode usually chosen for games is the one with up to 16 palettes, each of up to 256 colors. It is a good trade-off indeed, better than using 16 palettes of 16 colors for example.
Most implementations may cope with one general-purpose palette for all sprites (using an appropriate master palette), whereas more complex ones could rely on multiple palettes and associate to a given set of sprites (usually, animated characters) a particular palette. The increased color fidelity might not be worth the trouble of generating a set of palettes and choosing for each sprite the most appropriate palette.
We keep in mind that a lot of our sprites will come from the aforementioned Reiner's Tilesets. If we take Swordstan as an example (most probably our main character, as having multiple animations with multiple outside appearances), the source image (BMP in 24 Bit TrueColor), could be (taken from swordstan shield 96x bitmaps/attack se0000.bmp) :

The same image (here in PNG) with a 256-color dedicated optimal palette (i.e. all its colors have been chosen specifically for this image) looks almost exactly the same:

However we have to rely on a general-purpose palette here, that will be shared by all our sprites. As index #0 is reserved for transparency (colorkey), there are 255 colors to be chosen, in [1,255].
We chose to create programmatically our own shared (master) palette, for a better control. This palette aims at representing any bitmap image (as opposed to a palette made for a specific set of graphics) with as little color error as possible, knowing that we will have thousands of varied frames that will have to be automatically color-reduced against it.
The base of this palette is a 240-color 6-8-5 palette: for each of the 6 levels of red regularly distributed in the range of this color component, there are 8 levels of green, and for each of these green levels there are 5 levels of blue. Therefore 6*8*5 = 240 different colors are listed. Component ranges have been chosen in function of the sensibility of the normal human eye to every primary color.
Out of the 255-240 = 15 remaining colors, 8 are used for pure greys (which were lacking from the base palette). The 7 last colors have been specifically selected in frames from various characters (notably Stan), to match them more closely, regarding flesh, hair, etc.
We defined two kinds of file formats for actual palettes: a high-level one, the osdl.palette generic format, and a DS-specific one, the pal format.
osdl.palette formatWith this format, also known as unencoded format, a palette is made of a header, storing:
PaletteTag)pal formatWith this encoded format, quantized colors will be written, i.e. each color definition will be packed into 16 bits only (first bit set to 1, then 5 bits per quantized color component, in BGR order). The fact that a given index corresponds to a colorkey will not be stored in this encoded format, as a colorkey is expected to be always present, and set at palette index #0.
Therefore an actual palette describing n colors can be a simple file (ex: myPalette.pal) containing n 16-bit encoded colors (thus the file occupies 2.n bytes). As colors will have to respect the x555 BGR format, there will be only 5 bits for each color component, each component is thus quantized in [0,31].
This encoded format is directly usable by the Nintendo GBA and DS consoles. The extension of files respecting this format is preferably .pal.
We had chosen initially to generate our shared (master) palette with a python script we called generate_master_palette.py. As multiple palettes and multiple palette formats have to be supported, we had to develop a more complex program, generateMasterPalette.exe, whose source is generateMasterPalette.cc and which relies heavily on OSDL. The program generates three versions of this logical master palette, each saved according to both palette formats (.osdl.palette/.pal).
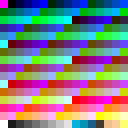
Indeed, once a base master palette has been defined, it has to be transformed for various needs. First one is to generate from the palette a 256-color panel that represents it. It is done thanks a Makefile (see Makefile.am): make master-palette-original.png generates the corresponding panel:

We can clearly see, from top-left to bottom-right, the magenta color key at first index, then the full 240-color gradient, then the set of grey colors, then the various hand-picked colors: three blue colors and some flesh-colored ones.
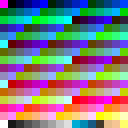
We can generate as well the same palette, but quantized like it would be when encoded in .pal format: each color component is scaled to the only 32 levels already mentioned, instead of the 256 levels of the original palette. The result, master-palette-quantized.png, looks however very similar to the original palette:

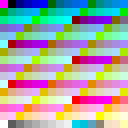
Last generated palette starts too from the original one, but performs a gamma-correction on it before quantizing it. The reason for this is that the final output device, the DS screen, displays darker colors than requested. We thus have to pre-correct these colors by selecting lighter colors on purpose.
This transformation is called gamma-correction, each normalized color component is to be set at the power 1/gamma before being denormalized.
We retained a gamma of 2.3 for the average DS screen (intermediate way between DS Fat and DS Lite, see also this discussion).
We apply the gamma-correction to the original master palette as well, to gain a better accuracy when the color-reduction of the gamma-corrected images will take place. The final quantization of this palette adds to this gamma-correction the effect of the .pal encoding. As expected, this palette looks brighter than the original :

In the process of frame conversion (which is implemented by pngToOSDLFrame.exe, whose source is pngToOSDLFrame.cc), one operation is to color-reduce an input frame (with full colors) to obtain the same frame, but using this time the master palette we discussed.
To do so, each pixel of the input image is matched against all the colors of the master palette. A distance in RGB colorspace between this pixel color and each palette color is computed, based on a combination of two weighted Euclidean distance functions. The closest palette color is then chosen for the color-reduced image.
This is implemented by the OSDL::Video::Palette::GetDistance method, declared in OSDLPalette.h and defined in OSDLPalette.cc. Note that the colorkey is skipped when scanning the master palette, otherwise the color-reduction algorithm could incorrectly use that color to approximate colors from the input image.
Now we can compare in a row:


We disabled for the first four tests the colorkey transformation, and for the mapping to the gamma-corrected palette the input image was itself gamma-corrected beforehand, as it ought to be.
Finally the result seems very good indeed, colors are well preserved in non gamma-corrected images. Note that the colorkey changed a bit in each image, notably due to the quantization and to the gamma-correction, but it did not trouble its management in last image.
Here is a screenshot of our testOSDLVideoFramebuffer.exe test program taken with the NO$GBA emulator:
It allows to better figure out the available sprite sizes: yellow is for height of 8 pixels, white for 16, blue of 32 and cyan for 64. 64x64 is the maximum size of a sprite. We deemed the most appropriate size of a character is in general the third blue shape, the 32x32 square: with its 4x4=16 tiles, its memory footprint should be bearable, and, compared to the rest of the screen, there is enough room to display the environment of the character (not too big, not too small).
Using Swordstan again as an example, knowing that Reiner's Tilesets offer bigger frames, the source image could be:


Resizing is preferably performed thanks to the Lanczos filter:  , resulting in sharper images than (bi)linear:
  or (bi)cubic:
These resized images have been obtained thanks to ImageMagick with following commands:
convert swordstan-original.png -filter Lanczos -resize 50x50 swordstan-IM-Lanczos.pngconvert swordstan-original.png -filter triangle -resize 50x50 swordstan-IM-Bilinear.pngconvert swordstan-original.png -filter Cubic -resize 50x50 swordstan-IM-Bicubic.pngOnce we have an image ready for animation (notably scaled-down, color-reduced gamma-corrected, etc.), we have to prepare it specifically so that it can be rendered directly by the Nintendo DS, whose 2D engines are tile-based.
First step is to extract the actual content of the frame from the original one: using a similar process as the one described here by Reiner, the creator of these tilesets, we want to get rid of all the useless sprite borders, while still being able to re-center the trimmed frame relatively to the other frames of the animation.
To do so, first we find the smallest upright rectangle which encloses the frame content, colorkey excluded:

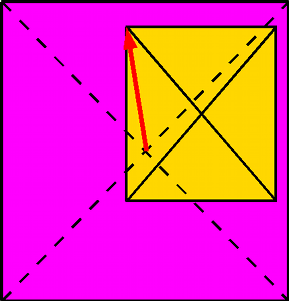
Our home-made rendering engine will have to render a given frame (whose original version is shown here as a magenta rectangle) centered at a given screen location [x;y] (expressed in pixels) corresponding here to the character position, thus the frame will have to store an offset (signed) vector [x_offset;y_offset]) (shown as the red arrow) so that, when the trimmed-down sprite (shown here as a gold rectangle) will be rendered from its upper-left corner at [x+x_offset;y+y_offset]) it will be correctly be re-centered:

The offset vector corresponds simply to the coordinates of the upper-left corner of the trimmed rectangle (trimmedRect, whose coordinates are initially defined relatively to the upper-left corner of the original rectangle) expressed relatively to the center of the original frame (frame):
|
x_offset and y_offset in its metadata.
Then we have to prepare the tiling of the trimmed content. It has to be copied to an image of its own, whose size will:
39x62, it leads our algorithm to select, as smallest enclosing shape, the 64x64 one:

On the DS, a sprite is rendered as a map of sprite tiles.
We can see, on the right of the previous example frame, full tiles being unused (filled only with the colorkey). These special tiles will not be duplicated in a given frame map or even between frame maps: only one copy of these colorkey-only tiles will be maintained in the full tile list (it will be set at its first position, tile index #0), to save some memory.
No special effort is made to share other tiles between frames, to use tile flipping or scaling/rotating, etc. as our assets will be precomputed for a given rendering: each tile has a large probability of being unique, knowing for example that our characters are not symmetrical (ex: they may carry a weapon on the right hand), thus flipping is not really an option.
In a frame file, after the OSDL header containing the metadata (frame tag, vector offset, palette identifier, sprite shape, etc.), first there will be the sprite tilemap, then the definition of the sprite tiles.
In a frame file, it is stored as a 1D array of index referring to the tile definitions stored later in the frame file. An index is a value in 8 bits, in [0;255]. Thus a sprite can refer up to 256 different tile definitions, knowing that the largest DS-supported sprite is 8x8 = 64 tiles.
The array scans the tiled sprite from left to right then for top to bottom. The number of index in the tilemap is deduced from the aforementioned sprite shape.
In a frame file, it is a set of 8x8 arrays of palette index. A given sprite can have any number of tile definitions, but up to 256 can be referred to, depending on the sprite shape up to 64 can be actually used, and usually there are less than tile definitions than possible tiles for the shape, as a given tile definition might be referenced more than once in the sprite map.
This is notably the case for the colorkey-only tile definition, which is referred to by index #0 but it never defined in a tilemap, as it is always available by convention in our tile definitions.
Let's take the character that is most probably the most complex one that will have to render: Stan.
First of all Stan has 8 different outside looks, sorted roughly according to the order in which they might appear in a story (example images are in low quality):


To each of these different outside looks correspond a set of attitudes (behaviours in action). Different looks have often different sets of attitudes.
For example, the unarmed Stan can:
For each attitude, eight directions have always to be taken into account : character facing north, south, west, east, and the four related diagonals.
As characters are usually asymmetric, one cannot deduce for example eastward animations from westward ones (showing the character rotate clockwise):


Finally, for each direction a given character attitude can be decomposed into a series of frames.
For example a Stan with sword and shield walking eastward uses following 8 frames in a cycle:


The number of frames depends on the attitude, but not on the direction: talking uses 7 frames, whereas walking 8.
Animations must be rendered for various game elements: characters (player character(s), NPC, monsters, etc.), special effects (explosions, fountains, etc.), animated objects (drawing bridge, door, etc.).
A given element (say, a character) can have multiple outside looks (unarmed, or with different weapons, clothing, injuries, etc.).
For a given outside look, various attitudes might be available (walking, running, fighting, etc.).
An attitude has usually to be defined according to 8 directions.
For each direction, a number of frames makes the effective animation.
Thus one has to plan NanimatedElements x Nlooks x Nattitudes x Ndirections x Nframes. Most games, just counting the characters (friend, foe, monsters, etc.), have to have at least a dozen of them.
Considering the worst case, the main character Stan (who is the most detailed one), we count roughly 8 looks x 7 attitudes on average x 8 directions x 7 frames on average = 3136 frames. This is quite huge.
Considering the average 27-kilobyte original image might be trimmed and reduced for the DS to 1 kilobyte (1024 = 32x32 pixels, as discussed in the sprite size section and 8 bits per pixel, as discussed in the sprite color section), the footprint might be, only for the characters, roughly equal to 12 characters x 3136 frames x 1024 bytes = 36 megabytes. We chose not to remove frames from animations, as fluidity is important. Moreover it would be a shame not to take advantage of assets of such quality.
Compared to the overall 656 kilobytes of VRAM memory, to the 4 megabytes of RAM available for code, sounds, other graphical elements, and to the up to 128 megabytes of storage provided by a commercial cartridge, this is a challenge that may be met if using appropriate streaming and caching.
After having taken into account all previous constraints (size, formats, colors, etc.), we chose the following process, that should led from the raw assets (coming for Reiner or other sources) to the precomputed content ready and optimized for the DS.
First step: per-animated object content sorting, to create a frame hierarchy based on: outside looks, then attitudes, then directions, then ordered frames.
Then, for each frame:
Finally, creation of:
To avoid to store too many informations in index files, filenames should respect the following conventions, so that they can be deduced rather than stored in an associative map.
The filename for a frame is made of a set of alphanumerical fields and a suffix: F1-F2-F3-F4-F5.osdl.frame.
Fields are:
A given field is not specific to the previous one. For example, the outside look (F2) ArmedWithASword may apply to multiple characters (F1) : Stan, but also all characters whose outside look can be described as "ArmedWithASword".
Each field is described by a look-up associative table (identifier repository), a key being a human-friendly unique symbol (ex: ArmedWithASword), each value being the numerical identifier of this key (positive integer starting at 1, ex: 27), to be interpreted in the context of the type they are associated with (here it is an outside look, we may have for example an attitude identifier of 27, which would be totally unrelated to the previous 27).
The table layout is a set of ASCII lines, each line specifying a key/value pair, the key being made of one word in CamelCase, the value being deduced from of the number of the line in the file. Thus, if the NorthEast key is at line 2, NorthEast = 2. Keys are sorted in alphabetical order (the one of the sort command).
The repository of:
Frame identifiers start from 1 onward, and go typically to 6.
All the assets which we transformed like described are referenced in our Asset Map (see notice below).
Note: this is currently an intentional broken link when searched from the Internet (non-local use). It is to comply with the will of the author of Reiner's Tilesets, whose only rule is not to have concurrent web pages to his, so that he can present his work as wanted. That's fair, and thanks again Reiner for your beautiful artwork !
|
All of them are free and open source. They have been used on GNU/Linux, but many of them are cross-platform.
All of them are free and open source. They have been used on GNU/Linux, but many of them are cross-platform.
TONC has been a powerful documentary source to better target the Nintendo DS hardware and understand the various subtleties of tiled graphics.
As many of our graphical assets come from the splendid work available in Reiner's Tilesets, some specific informations are gathered here.
Orginal images are BMP, usually with a kaki (greenish) colorkey: 6a4c30 in hexadecimal.
If you have information more detailed or more recent than those presented in this document, if you noticed errors, neglects or points insufficiently discussed, drop us a line!